|
дкЕквЛИіMVCНЬГЬеТжаЃЌЮвУЧбЇЛсСЫШчКЮдкMVCПижЦЦїКЭЪгЭМНјааНЛЛЅЁЃдкБОНЬГЬжаЃЌЮвУЧНЋЯђЧАИќНјвЛВНЃЌбЇЯАШчКЮЪЙгУФЃаЭДДНЈИпМЖгІгУГЬађРДДДНЈЃЌБрМЃЌЩОГ§гУЛЇЃЌдкЮвУЧЕФгІгУГЬађжаВщПДСаБэЁЃ
ЯТУцЪЧгУРДДДНЈИпМЖMVCгІгУГЬађЕФВНжш
Ек1ВНЃКбЁдё File->New->Project->ASP.NET MVC WebгІгУ. ВЂУќУћЮЊЃКAdvancedMVCApplication. ЕЅЛїШЗЖЈЁЃдкНгЯТРДЕФДАПкжаЃЌбЁдёФЃАхзїЮЊЛЅСЊЭјгІгУГЬађКЭЪгЭМв§ЧцЮЊRazorЁЃзЂвтЃЌЮвУЧетИіЪБКђЪЙгУЕФЪЧФЃАхЃЌЖјВЛЪЧвЛИіПеЕФгІгУГЬађЁЃ
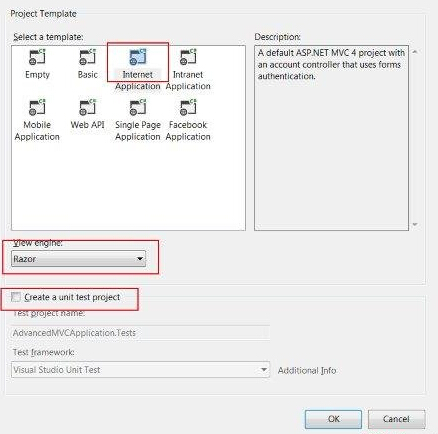
етНЋДДНЈвЛИіаТЕФНтОіЗНАИЕФЯюФПЃЌШчЯТЭМЫљЪОЁЃгЩгкЮвУЧЪЙгУЕФЪЧФЌШЯЕФASP.NETжїЬтЃЌЫќДјгабљБОЪгЭМЃЌПижЦЦїЃЌФЃаЭКЭЦфЫћЮФМўЁЃ
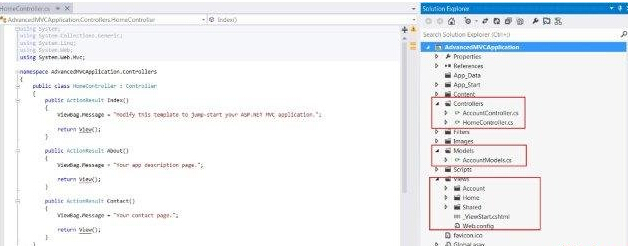
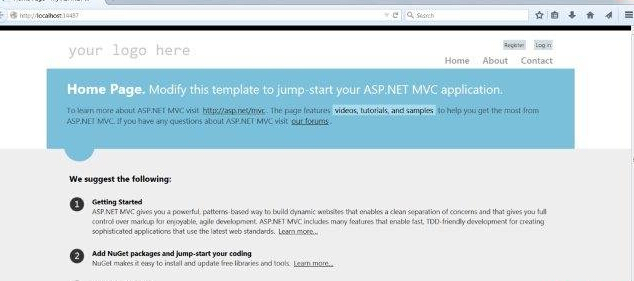
ЙЙНЈНтОіЗНАИЃЌВЂдЫаагІгУГЬађЃЌПДПДЫќЕФФЌШЯЪфГіЃЌШчЯТЃК
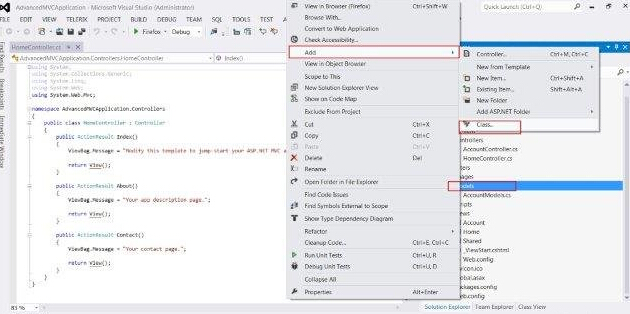
Ек2ВНЃКЮвУЧНЋдіМгвЛИіаТЕФФЃЪНЃЌНЋЖЈвхЕФгУЛЇЪ§ОнНсЙЙЁЃгвМќЕЅЛїModelsЮФМўМаЃЌШЛКѓЕуЛї Add->Class. УќУћЮЊUserModelЃЌШЛКѓЕЅЛїAddЁЃ
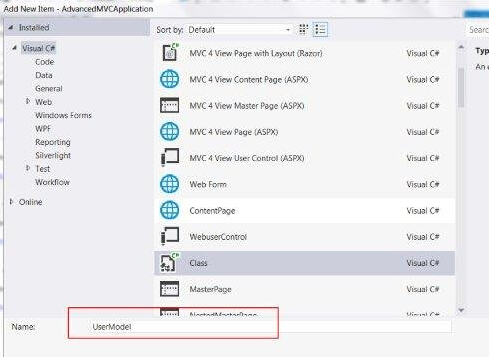
Ек3ВНЃКЯждкНЋвдЯТДњТыИДжЦЕНаТДДНЈЕФUserModel.csЃК
using System;
using System.ComponentModel;
using System.ComponentModel.DataAnnotations;
using System.Web.Mvc.Html;

namespace AdvancedMVCApplication.Models
{
    public class UserModels
    {
        [Required]
        public int Id { get; set; }
        [DisplayName("First Name")]
        [Required(ErrorMessage = "First name is required")]
        public string FirstName { get; set; }

        [Required]
        public string LastName { get; set; }

        public string Address { get; set; }

        [Required]
        [StringLength(50)]
        public string Email { get; set; }

        [DataType(DataType.Date)]
        public DateTime DOB { get; set; }

        [Range(100,1000000)]
        public decimal Salary { get; set; }
    }
} |
дкЩЯУцЕФДњТыжаЃЌЮвУЧжИЖЈЕФгУЛЇФЃаЭбщжЄЫљгаЕФВЮЪ§ЃЌЦфЪ§ОнРраЭКЭШчЫљашЕФзжЖЮКЭГЄЖШЁЃ
Ек4ВНЃКЯждкЃЌЮвУЧгагУЛЇФЃаЭзМБИБЃДцЪ§ОнЃЌЯждкДДНЈвЛИіРрЮФМўUsers.cs ЦфжаНЋАќКЌгУгкВщПДгУЛЇЃЌЬэМгЃЌБрМКЭЩОГ§гУЛЇЕФЗНЗЈЁЃгвМќЕЅЛїФЃаЭЃЌШЛКѓЕЅЛї Add->Class. УќУћЮЊЃКUsers. етНЋДДНЈusers.csРрдкModelsФкВПЁЃ
ИДжЦЯТУцЕФДњТыЕНusers.csРрЁЃ
using System;
using System.Collections.Generic;
using System.EnterpriseServices;

namespace AdvancedMVCApplication.Models
{
    public class Users
    {
        public List UserList = new List();

        //action to get user details
        public UserModels GetUser(int id)
        {
            UserModels usrMdl = null;

            foreach (UserModels um in UserList)
                if (um.Id == id)
                    usrMdl = um;
            return usrMdl;
        }

        //action to create new user
        public void CreateUser(UserModels userModel)
        {
            UserList.Add(userModel);
        }

        //action to udpate existing user
        public void UpdateUser(UserModels userModel)
        {
            foreach (UserModels usrlst in UserList)
            {
                if (usrlst.Id == userModel.Id)
                {
                    usrlst.Address = userModel.Address;
                    usrlst.DOB = userModel.DOB;
                    usrlst.Email = userModel.Email;
                    usrlst.FirstName = userModel.FirstName;
                    usrlst.LastName = userModel.LastName;
                    usrlst.Salary = userModel.Salary;
                    break;
                }
            }
        }

        //action to delete exising user
        public void DeleteUser(UserModels userModel)
        {
            foreach (UserModels usrlst in UserList)
            {
                if (usrlst.Id == userModel.Id)
                {
                    UserList.Remove(usrlst);
                    break;
                }
            }
        }
    }
} |
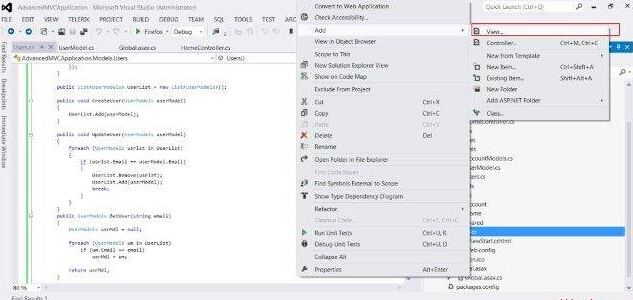
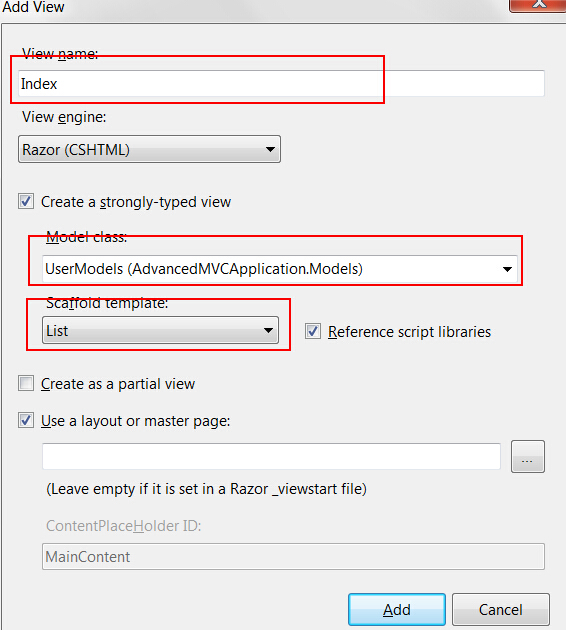
Ек5ВНЃКвЛЕЉЮвУЧгаUserModel.csКЭUsers.csЃЌНЋдіМгфЏРРФЃаЭВщПДЃЌЬэМгЃЌБрМКЭЩОГ§гУЛЇЁЃЪзЯШЃЌШУЮвУЧДДНЈвЛИіЪгЭМгУРДДДНЈгУЛЇЁЃгвМќЕЅЛїViewsЮФМўМаЃЌШЛКѓЕуЛї Add->View.
дкНгЯТРДЕФДАПкжаЃЌбЁдёЪгЭМУћГЦЮЊUserAddЃЌЪгЭМв§ЧцЮЊRazorЃЌВЂбЁдёДДНЈвЛИіЧПРраЭЕФЪгЭМИДбЁПђЁЃ
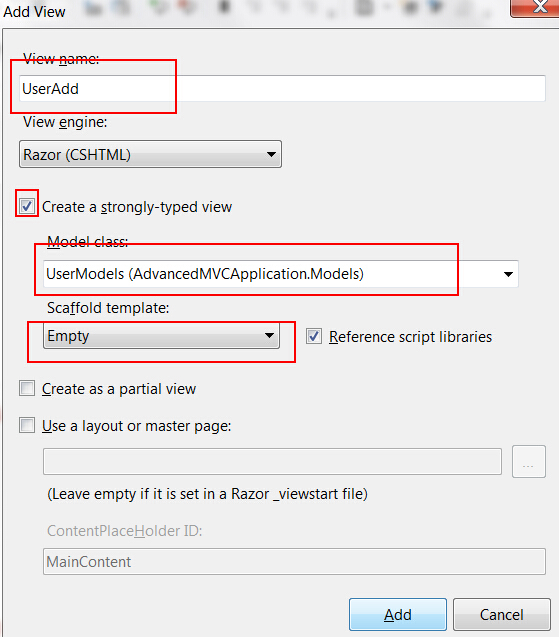
ЕЅЛїЬэМгЁЃдкФЌШЯЧщПіЯТетНЋДДНЈЯТСаCSHMLДњТыЃЌШчЯТЫљЪОЃК
@model AdvancedMVCApplication.Models.UserModels

@{
    ViewBag.Title = "UserAdd";
}

<h2>UserAdd</h2>

@using (Html.BeginForm()) {
    @Html.ValidationSummary(true)

    <fieldset>
        <legend>UserModels</legend>

        <div class="editor-label">
            @Html.LabelFor(model => model.FirstName)
        </div>
        <div class="editor-field">
            @Html.EditorFor(model => model.FirstName)
            @Html.ValidationMessageFor(model => model.FirstName)
        </div>

        <div class="editor-label">
            @Html.LabelFor(model => model.LastName)
        </div>
        <div class="editor-field">
            @Html.EditorFor(model => model.LastName)
            @Html.ValidationMessageFor(model => model.LastName)
        </div>

        <div class="editor-label">
            @Html.LabelFor(model => model.Address)
        </div>
        <div class="editor-field">
            @Html.EditorFor(model => model.Address)
            @Html.ValidationMessageFor(model => model.Address)
        </div>

        <div class="editor-label">
            @Html.LabelFor(model => model.Email)
        </div>
        <div class="editor-field">
            @Html.EditorFor(model => model.Email)
            @Html.ValidationMessageFor(model => model.Email)
        </div>

        <div class="editor-label">
            @Html.LabelFor(model => model.DOB)
        </div>
        <div class="editor-field">
            @Html.EditorFor(model => model.DOB)
            @Html.ValidationMessageFor(model => model.DOB)
        </div>

        <div class="editor-label">
            @Html.LabelFor(model => model.Salary)
        </div>
        <div class="editor-field">
            @Html.EditorFor(model => model.Salary)
            @Html.ValidationMessageFor(model => model.Salary)
        </div>

        <p>
            <input type="submit" value="Create" />
        </p>
    </fieldset>
}

<div>
    @Html.ActionLink("Back to List", "Index")
</div>

@section Scripts {
    @Scripts.Render("~/bundles/jqueryval")
} |
е§ШчЫљПДЕНЕФЃЌетИіЪгЭМАќКЌзжЖЮЕФЫљгаЪєадаХЯЂЕФбщжЄЯћЯЂЃЌБъЧЉЕШЃЌДЫЪгЭМдкЮвУЧзюжеЕФгІгУГЬађПДЦ№РДЯёетбљЃК
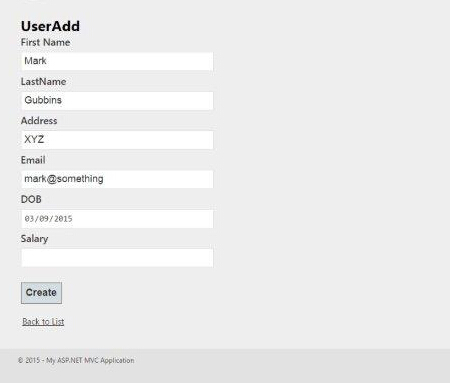
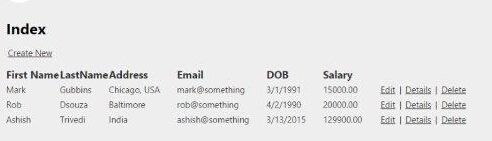
РрЫЦUserAdd,ЃЌЯждкЮвУЧНЋдіМгШчЯТЫФИіЪгЭМДњТыЃК
Index.cshtml
ИУЪгЭМНЋЯдЪОЫљгаДцдкгкЮвУЧЕФЯЕЭГжаЕФгУЛЇдкIndexвГУцЩЯЁЃ
@model IEnumerable<AdvancedMVCApplication.Models.UserModels>

@{
    ViewBag.Title = "Index";
}

<h2>Index</h2>

<p>
    @Html.ActionLink("Create New", "UserAdd")
</p>
<table>
    <tr>
        <th>
            @Html.DisplayNameFor(model => model.FirstName)
        </th>
        <th>
            @Html.DisplayNameFor(model => model.LastName)
        </th>
        <th>
            @Html.DisplayNameFor(model => model.Address)
        </th>
        <th>
            @Html.DisplayNameFor(model => model.Email)
        </th>
        <th>
            @Html.DisplayNameFor(model => model.DOB)
        </th>
        <th>
            @Html.DisplayNameFor(model => model.Salary)
        </th>
        <th></th>
    </tr>

@foreach (var item in Model) {
    <tr>
        <td>
            @Html.DisplayFor(modelItem => item.FirstName)
        </td>
        <td>
            @Html.DisplayFor(modelItem => item.LastName)
        </td>
        <td>
            @Html.DisplayFor(modelItem => item.Address)
        </td>
        <td>
            @Html.DisplayFor(modelItem => item.Email)
        </td>
        <td>
            @Html.DisplayFor(modelItem => item.DOB)
        </td>
        <td>
            @Html.DisplayFor(modelItem => item.Salary)
        </td>
        <td>
            @Html.ActionLink("Edit", "Edit", new { id=item.Id }) |
            @Html.ActionLink("Details", "Details", new { id=item.Id }) |
            @Html.ActionLink("Delete", "Delete", new { id=item.Id })
        </td>
    </tr>
}

</table> |
ДЫЪгЭМдкЮвУЧзюжеЕФгІгУГЬађПДЦ№РДШчЯТЃК
Details.cshtml:
ДЫЪгЭМНЋЯдЪОЬиЖЈгУЛЇЕФЯъЯИаХЯЂЃЌЕБЮвУЧЕуЛїгУЛЇМЧТМЁЃ
@model AdvancedMVCApplication.Models.UserModels

@{
    ViewBag.Title = "Details";
}

<h2>Details</h2>

<fieldset>
    <legend>UserModels</legend>

    <div class="display-label">
         @Html.DisplayNameFor(model => model.FirstName)
    </div>
    <div class="display-field">
        @Html.DisplayFor(model => model.FirstName)
    </div>

    <div class="display-label">
         @Html.DisplayNameFor(model => model.LastName)
    </div>
    <div class="display-field">
        @Html.DisplayFor(model => model.LastName)
    </div>

    <div class="display-label">
         @Html.DisplayNameFor(model => model.Address)
    </div>
    <div class="display-field">
        @Html.DisplayFor(model => model.Address)
    </div>

    <div class="display-label">
         @Html.DisplayNameFor(model => model.Email)
    </div>
    <div class="display-field">
        @Html.DisplayFor(model => model.Email)
    </div>

    <div class="display-label">
         @Html.DisplayNameFor(model => model.DOB)
    </div>
    <div class="display-field">
        @Html.DisplayFor(model => model.DOB)
    </div>

    <div class="display-label">
         @Html.DisplayNameFor(model => model.Salary)
    </div>
    <div class="display-field">
        @Html.DisplayFor(model => model.Salary)
    </div>
</fieldset>
<p>
    @Html.ActionLink("Edit", "Edit", new { id=Model.Id }) |
    @Html.ActionLink("Back to List", "Index")
</p> |
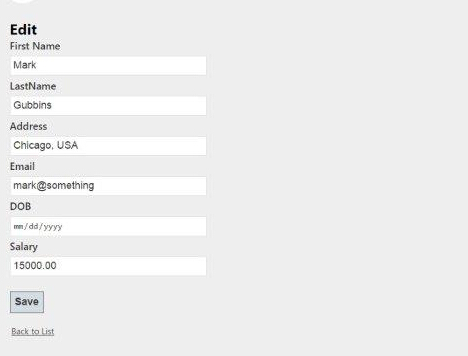
ДЫЪгЭМдкЮвУЧзюжеЕФгІгУГЬађПДЦ№РДЯёетбљЃК

Edit.cshtml:
етЪгЭМНЋЯдЪОЯжгагУЛЇЕФЯъЯИаХЯЂЕФБрМБэЕЅЁЃ
@model AdvancedMVCApplication.Models.UserModels

@{
    ViewBag.Title = "Edit";
}

<h2>Edit</h2>

@using (Html.BeginForm()) {
    @Html.AntiForgeryToken()
    @Html.ValidationSummary(true)

    <fieldset>
        <legend>UserModels</legend>

        @Html.HiddenFor(model => model.Id)

        <div class="editor-label">
            @Html.LabelFor(model => model.FirstName)
        </div>
        <div class="editor-field">
            @Html.EditorFor(model => model.FirstName)
            @Html.ValidationMessageFor(model => model.FirstName)
        </div>

        <div class="editor-label">
            @Html.LabelFor(model => model.LastName)
        </div>
        <div class="editor-field">
            @Html.EditorFor(model => model.LastName)
            @Html.ValidationMessageFor(model => model.LastName)
        </div>

        <div class="editor-label">
            @Html.LabelFor(model => model.Address)
        </div>
        <div class="editor-field">
            @Html.EditorFor(model => model.Address)
            @Html.ValidationMessageFor(model => model.Address)
        </div>

        <div class="editor-label">
            @Html.LabelFor(model => model.Email)
        </div>
        <div class="editor-field">
            @Html.EditorFor(model => model.Email)
            @Html.ValidationMessageFor(model => model.Email)
        </div>

        <div class="editor-label">
            @Html.LabelFor(model => model.DOB)
        </div>
        <div class="editor-field">
            @Html.EditorFor(model => model.DOB)
            @Html.ValidationMessageFor(model => model.DOB)
        </div>

        <div class="editor-label">
            @Html.LabelFor(model => model.Salary)
        </div>
        <div class="editor-field">
            @Html.EditorFor(model => model.Salary)
            @Html.ValidationMessageFor(model => model.Salary)
        </div>

        <p>
            <input type="submit" value="Save" />
        </p>
    </fieldset>
}

<div>
    @Html.ActionLink("Back to List", "Index")
</div>

@section Scripts {
    @Scripts.Render("~/bundles/jqueryval")
}
|
ДЫЪгЭМдкЮвУЧЕФгІгУГЬађПДЦ№РДШчЯТЃК
Delete.cshtml:
ДЫЪгЭМНЋЯдЪОДАЬхгУгкЩОГ§ЯжгагУЛЇЁЃ
@model AdvancedMVCApplication.Models.UserModels

@{
    ViewBag.Title = "Delete";
}
<h2>Delete</h2>

<h3>Are you sure you want to delete this?</h3>
<fieldset>
    <legend>UserModels</legend>

    <div class="display-label">
         @Html.DisplayNameFor(model => model.FirstName)
    </div>
    <div class="display-field">
        @Html.DisplayFor(model => model.FirstName)
    </div>

    <div class="display-label">
         @Html.DisplayNameFor(model => model.LastName)
    </div>
    <div class="display-field">
        @Html.DisplayFor(model => model.LastName)
    </div>

    <div class="display-label">
         @Html.DisplayNameFor(model => model.Address)
    </div>
    <div class="display-field">
        @Html.DisplayFor(model => model.Address)
    </div>

    <div class="display-label">
         @Html.DisplayNameFor(model => model.Email)
    </div>
    <div class="display-field">
        @Html.DisplayFor(model => model.Email)
    </div>

    <div class="display-label">
         @Html.DisplayNameFor(model => model.DOB)
    </div>
    <div class="display-field">
        @Html.DisplayFor(model => model.DOB)
    </div>

    <div class="display-label">
         @Html.DisplayNameFor(model => model.Salary)
    </div>
    <div class="display-field">
        @Html.DisplayFor(model => model.Salary)
    </div>
</fieldset>
@using (Html.BeginForm()) {
    @Html.AntiForgeryToken()
    <p>
        <input type="submit" value="Delete" /> |
        @Html.ActionLink("Back to List", "Index")
    </p>
} |
ДЫЪгЭМдкЮвУЧзюжеЕФгІгУГЬађПДЦ№РДЯёетбљЃК

Ек6ВНЃКЮвУЧвбОдіМгФЃаЭКЭЪгЭМдкгІгУГЬађжаЁЃЯждкЬэМгвЛИіПижЦЦїЃЌгУгкЪгЭМЁЃ гвМќЕЅЛїControllersЮФМўМаЃЌШЛКѓЕуЛї Add->Controller. УќУћЮЊЃК UserController.
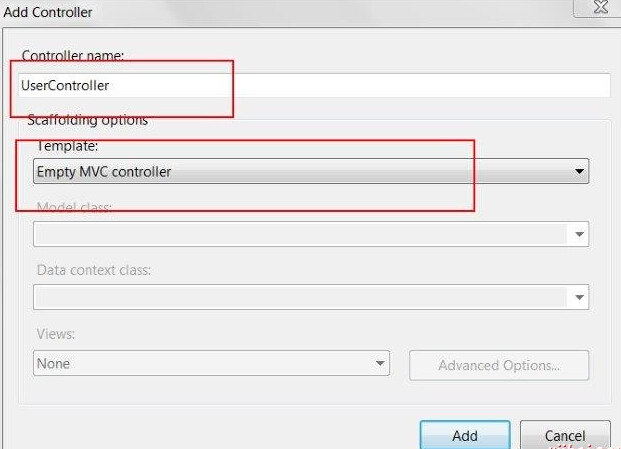
ФЌШЯЧщПіЯТЃЌПижЦЦїРрНЋгУЯТУцЕФДњТыРДДДНЈЃК
using System;
using System.Collections.Generic;
using System.Linq;
using System.Web;
using System.Web.Mvc;
using AdvancedMVCApplication.Models;

namespace AdvancedMVCApplication.Controllers
{
   public class UserController : Controller
    {
        private static Users _users = new Users();
        public ActionResult Index()
        {
            return View(_users.UserList);
        }
    }
} |
дкЩЯУцЕФДњТыжаЃЌIndexЗНЗЈНЋдкГЪЯжгУЛЇСаБэдкIndexвГУцЩЯЁЃ
Ек6ВНЃКгвМќЕЅЛїIndexЗНЗЈЃЌВЂбЁдёДДНЈЪгЭМРДДДНЈIndexвГУцЪгЭМЃЈЦфжаЛсСаГіЫљгагУЛЇЃЌВЂЬсЙЉбЁЯюРДДДНЈаТЕФгУЛЇЃЉЁЃ
Ек7ВНЃКЯждкЬэМгвдЯТДњТыUserController.csЁЃдкетЖЮДњТыжаЃЌЮвУЧДДНЈВйзїЗНЗЈеыЖдВЛЭЌЕФгУЛЇВйзїЃЌЗЕЛижЎЧАДДНЈЯргІЕФЪгЭМЁЃ
ЮвУЧНЋЬэМгСНИіЗНЗЈЮЊУПИіВйзїЃКGETКЭPOSTЁЃЕБЛёШЁЪ§ОнЪБЃЌЦфHttpGetБЛЪЙгУЁЃHttpPostНЋгУгкДДНЈ/ИќаТЪ§ОнЁЃР§ШчЃЌЕБЮвУЧвЊЬэМгаТгУЛЇЃЌашвЊвЛИіБэЕЅРДЬэМггУЛЇЃЌетЪЧвЛИіGETВйзїЁЃЕБЮвУЧЬюаДБэИёЃЌВЂЬсНЛетаЉжЕЃЌашвЊЪЙгУPOSTЗНЗЈЁЃ
//Action for Index View
public ActionResult Index()
{
    return View(_users.UserList);
}

//Action for UserAdd View
[HttpGet]
public ActionResult UserAdd()
{
    return View();
}
[HttpPost]
public ActionResult UserAdd(UserModels userModel)
{
    _users.CreateUser(userModel);
    return View("Index", _users.UserList);
}

//Action for Details View
[HttpGet]
public ActionResult Details(int id)
{
    return View(_users.UserList.FirstOrDefault(x => x.Id == id));
}
[HttpPost]
public ActionResult Details()
{
    return View("Index", _users.UserList);
}

//Action for Edit View
[HttpGet]
public ActionResult Edit(int id)
{
    return View(_users.UserList.FirstOrDefault(x=>x.Id==id));
}
[HttpPost]
public ActionResult Edit(UserModels userModel)
{
    _users.UpdateUser(userModel);
    return View("Index", _users.UserList);
}

//Action for Delete View
[HttpGet]
public ActionResult Delete(int id)
{
    return View(_users.UserList.FirstOrDefault(x => x.Id == id));
}
[HttpPost]
public ActionResult Delete(UserModels userModel)
{
    _users.DeleteUser(userModel);
    return View("Index", _users.UserList);
} sers.UserList);
} |
Ек8ВНЃКзюКѓвЊзіЕФОЭЪЧЕНApp_StartЮФМўМаевЕНRouteConfig.csЮФМўЃЌВЂИќИФФЌШЯЕФПижЦЦїЁЃ
defaults: new { controller = "User", action = "Index", id = UrlParameter.Optional } |
Ек9ВНЃКЯТУцЪЧИпМЖгІгУЪОР§ГЬађЦєЖЏКЭдЫааЁЃЯждкдЫаагІгУГЬађЁЃНЋФмЙЛПДЕНетбљЕФгІгУГЬађЃЌВЂПЩвджДааЬэМгЃЌВщПДЃЌБрМЃЌЩОГ§гУЛЇЃЌвђЮЊдкЧАУцЕФНиЭМвбОПДЕНСЫЫљгаЙІФмЁЃ
|