Selenium����
Selenium�����Ƿֲ��ڶ����������������ԣ�ʹ�����ܹ�����(ͬʱ)ִ�нű�������ִ����������в���ʱ��Ĺ��ߡ���������ǿ��ٶ�ȷ�ķ������ӿ��˿�������Ϳ�ƽ̨�IJ��ԡ�
Selenium����ʹ�����ܹ�ִ�в��е�webdriver��Selenium��Զ�̿��ƵIJ��ԣ���ʹ����ͬ�Ĵ���Ļ����ϣ���ˣ����벻�ش�������ִ��ϵͳ�ϵĶ��ʵ����Selenium�������Ķ���������������������webdriver����Selenium
RC����ִ�нű���
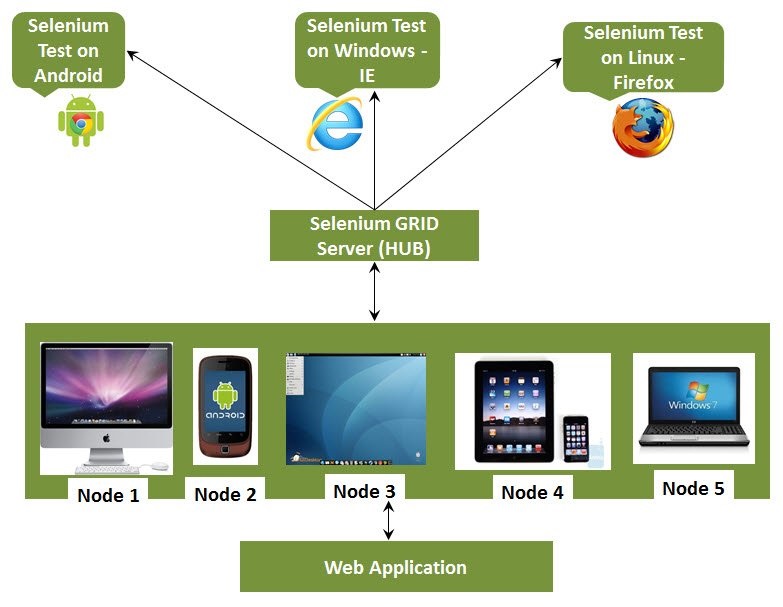
Selenium ���������Ŧ�ͽڵ�
Hub - ������Ҳ��������Ϊ�������䵱���ĵ����ڵIJ��Խ���������Selenium����ֻ��һ��������������һ̨����������һ�Ρ�
Node - �ڵ���Seleniumʵ����������ִ�в��Եļ����������Դ��������п������κβ���ϵͳ�����ҿ������κ���֧�ֵ������Selenium�����һ�������ڵ㡣
��ϵ�ṹ
Selenium �������ϵ�ṹ���ü�����ͼ�����͡�
ʹ��������
Ϊ������������������Ҫȷ����ѭһ����Э�顣���������漰����Ҫ���裬�˽����ǵ�ÿһ��ϸ�ڡ�
Configuring Hub
Configuring Nodes
Develop Script
XML Preperation
Test Execution
Result Analysis
����Hub
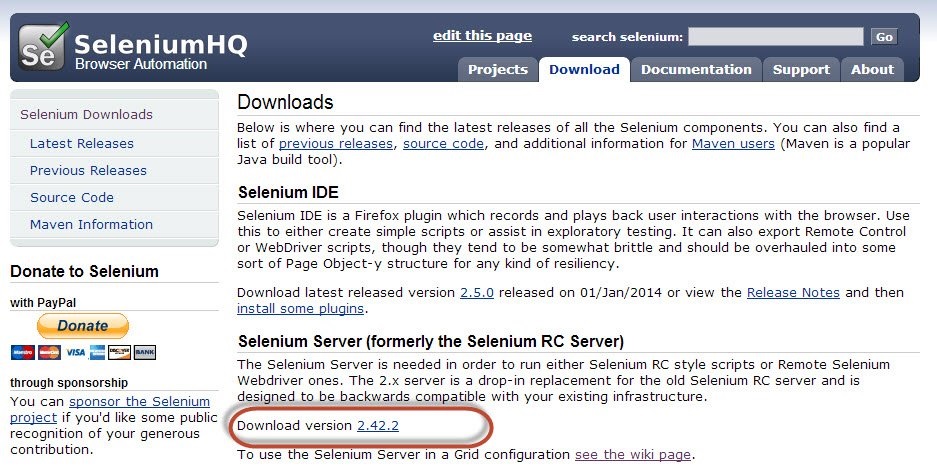
����1����http://docs.seleniumhq.org/download/�������µ�Selenium����������JAR�ļ���ͨ������汾������ʾ���ء�
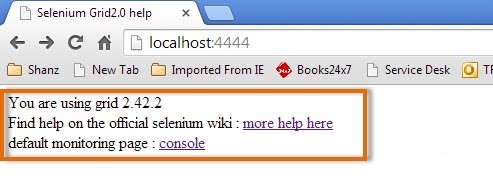
��2����ʹ��������������Selenium�����������ļ����������ڣ����ǽ�ʹ�ö˿ڡ�4444��������������
ע����ȷ���˿ڣ�4444����û�б�����Ӧ�ó���ռ�á�
| java
-jar selenium-server-standalone-2.25.0.jar
-port 4444 -role hub -nodeTimeout 1000 |
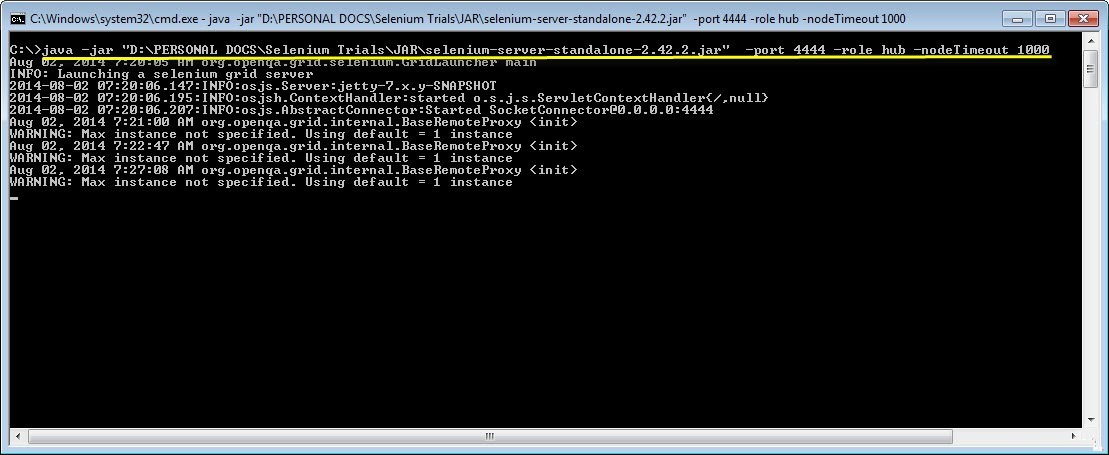
��3�������ڴ��������Ȼ��Ӽ�����������http//localhost:4444 ��������ִ�е�ϵͳ���裣2����
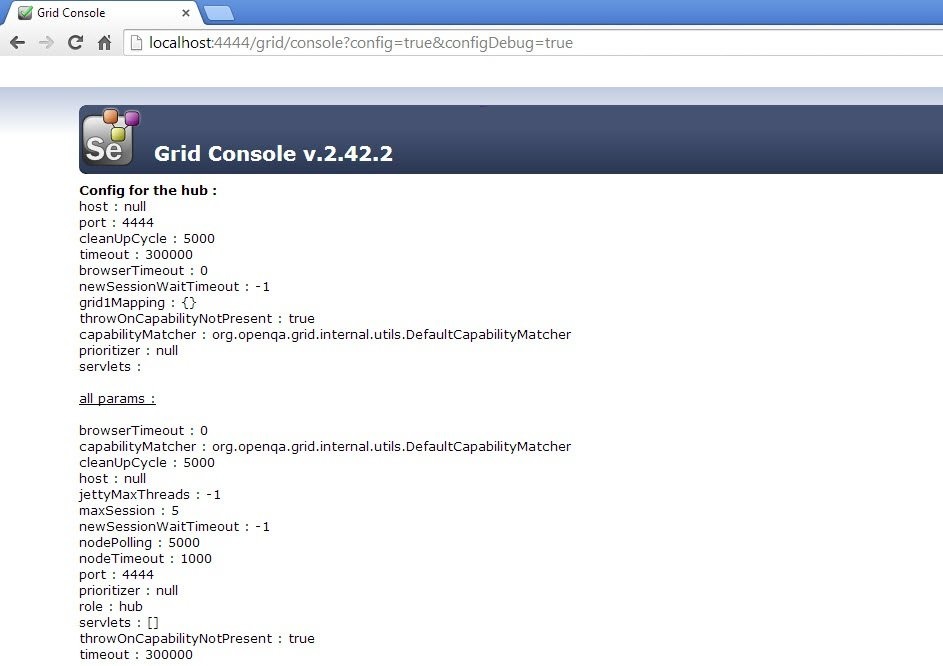
��4�������ڵ����console�����ӣ�Ȼ����view config��������ʾhub�����á�����Ŀǰ�����ǻ�û�еõ��κνڵ㣬������ǽ�������ϸ�ڡ�
���ýڵ�
��1������¼���ڵ㣨��ִ�нű�����Ȼ���滻�ļ����еġ�selenium-server-standalone-2.42.2����������Ҫ����ڵ�ʱָ��selenium-server-standalone
��JAR��
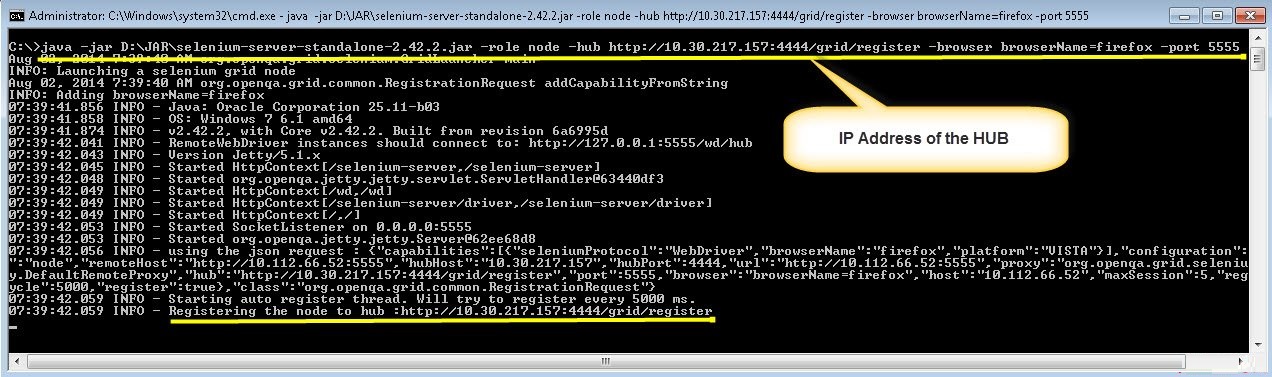
��2����ʹ��������������Firefox�ڵ㡣
java
-jar D:JARselenium-server-standalone-2.42.2.jar
-role node -hub http://10.30.217.157:4444/grid/register
-browser browserName=firefox -port 5555
Where,
D:JARselenium-server-standalone-2.42.2.jar
= Location of the Selenium Server Standalone
Jar File(on the Node Machine)
http://10.30.217.157:4444 = IP Address of
the Hub and 4444 is the port of the Hub
browserName = firefox (Parameter to specify
the Browser name on Nodes)
5555 = Port on which Firefox Node would
be up and running. |
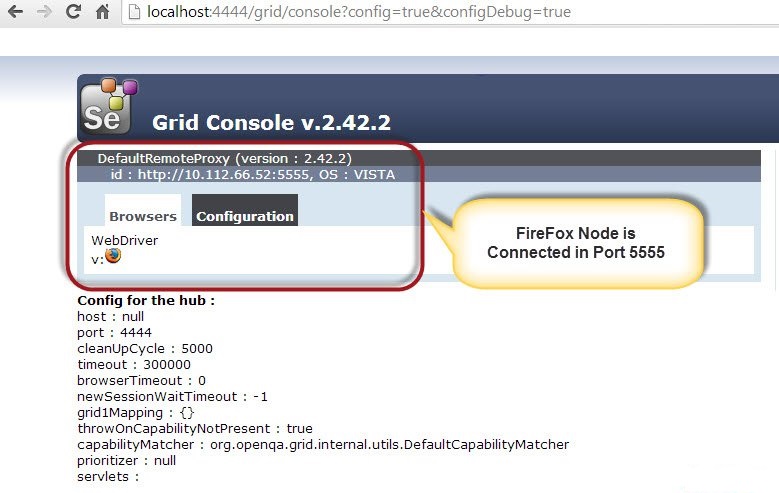
��3����ִ�и���������ڻع�ͷ����������������URL - http://10.30.217.157:4444�ͼ��������ڻ���ʾ�������ӵĽڵ㡣
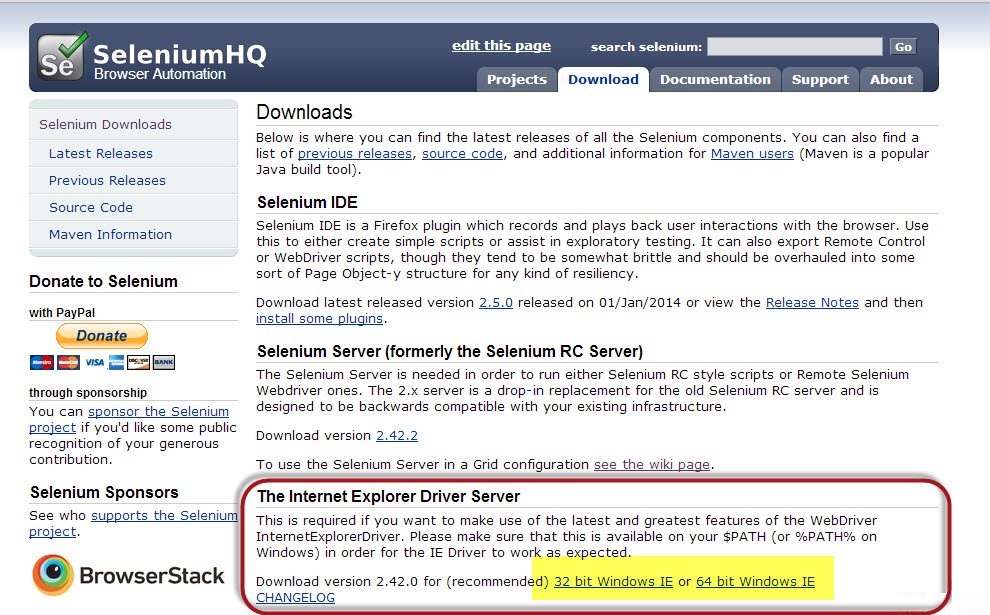
��4�������ڣ�����������Internet Explorer�ڵ㡣��������IE������ڵ㣬������Ҫȷ�����������صĽڵ���ϵ�Internet
Explorer��������
��5����Ҫ����Internet Explorer���������������IJ���ϵͳ�ļܹ�������http://docs.seleniumhq.org/download/�����ء����غ��ѹ��exe�ļ�����������������б���Ϊͬʱ�Ƴ�IE������ڵ��ϵ�һ���ļ��С�
��6����ʹ��������������IE�������
C:>java
-Dwebdriver.ie.driver=D:IEDriverServer.exe
-jar D:JARselenium-server-standalone-2.42.2.jar
-role webdriver -hub http://10.30.217.157:4444/grid/register
-browser browserName=ie,platform=WINDOWS -port
5558
Where,
D:IEDriverServer.exe = The location of the
downloaded the IE Driver(on the Node Machine)
D:JARselenium-server-standalone-2.42.2.jar
= Location of the Selenium Server Standalone
Jar File(on the Node Machine)
http://10.30.217.157:4444 = IP Address of
the Hub and 4444 is the port of the Hub
browserName = ie (Parameter to specify the
Browser name on Nodes)
5558 = Port on which IE Node would be up
and running. |
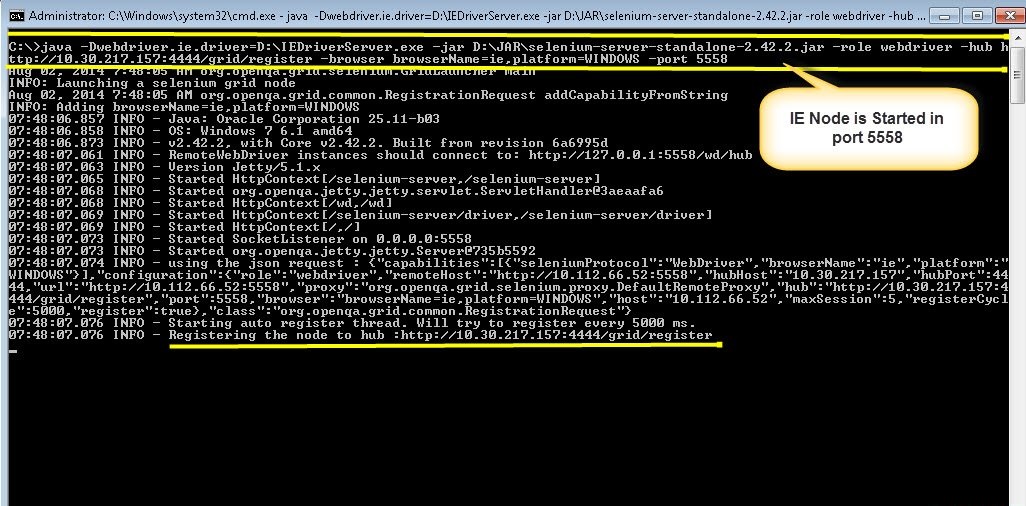
��7����ִ�и�����������ٻص���������������URL- http://10.30.217.157:4444
���������ڻ���ʾ�����ӵ�IE������ڵ㡣

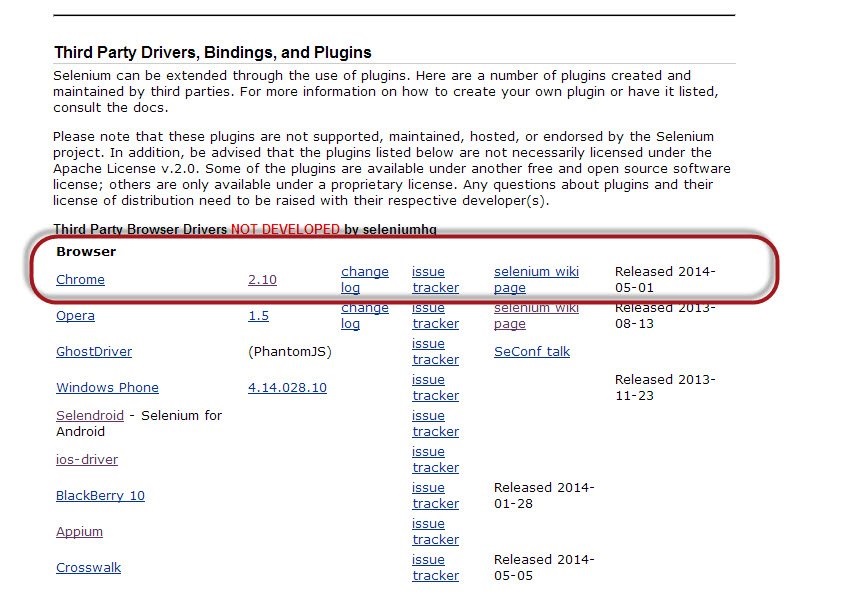
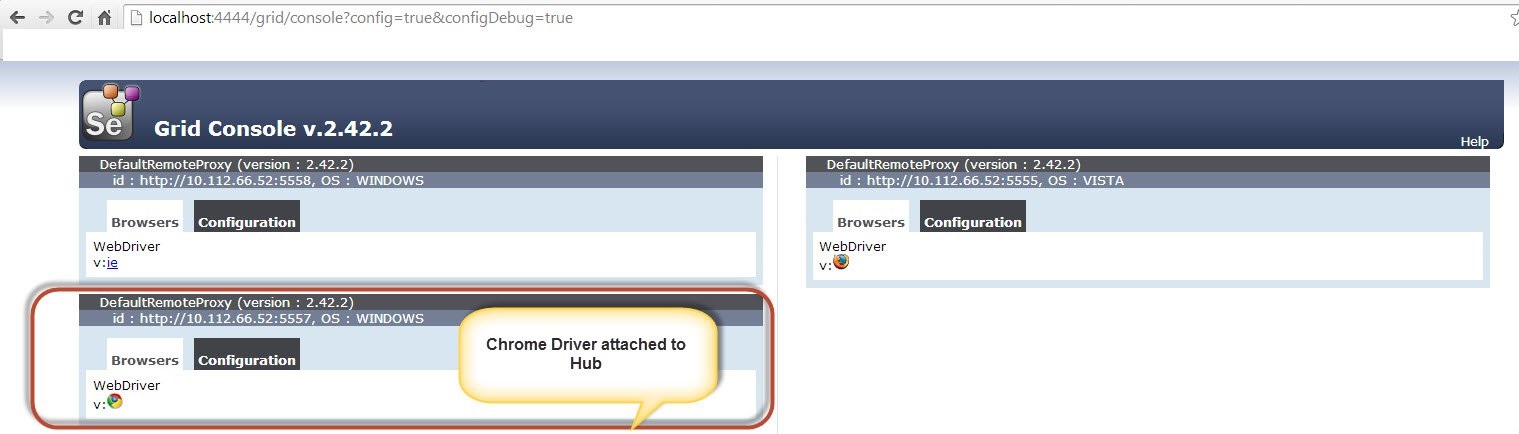
��8����������������Chrome�ڵ㡣��������������ڵ㣬������Ҫȷ�����������صĽڵ�������������������
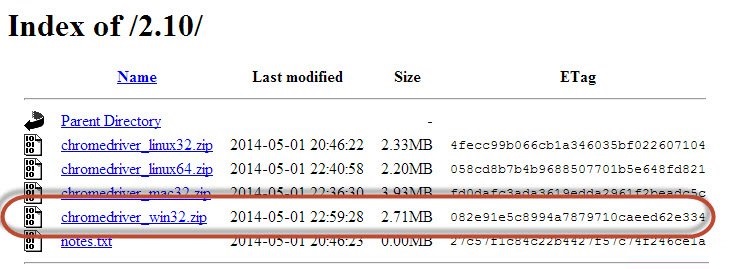
��9��������Chrome�����������������http://docs.seleniumhq.org/download/���������������������������Ȼ���汾�š�2.10��������ͼ��ʾ��
��10�������ػ��ڲ���ϵͳ�����͵������������ǻ�ִ������Windows������������ǽ����ص�Chrome�������Windows�����������غ��ѹ��exe�ļ�������������ͬʱ����Chrome�ڵ㱻��Ϊһ���ļ��С�
��11����ʹ��������������chrome ��
C:>java
-Dwebdriver.chrome.driver=D:chromedriver.exe
-jar D:JARselenium-server-standalone-2.42.2.jar
-role webdriver -hub http://10.30.217.157:4444/grid/register
-browser browserName=chrome,platform=WINDOWS
-port 5557
Where,
D:chromedriver.exe = The location of the
downloaded the chrome Driver(on the Node
Machine)
D:JARselenium-server-standalone-2.42.2.jar
= Location of the Selenium Server Standalone
Jar File(on the Node Machine)
http://10.30.217.157:4444 = IP Address of
the Hub and 4444 is the port of the Hub
browserName = chrome (Parameter to specify
the Browser name on Nodes)
5557 = Port on which chrome Node would be
up and running. |

��7����ִ�и�����������ٻؼ�������������URL- http://10.30.217.157:4444
���������ڻ���ʾ���ӵ�chrome �ڵ㡣
�����ű�
��1�������ǽ�����ʹ��TestNG���ԡ�������������У����ǽ��Ƴ�ʹ��Զ��webdriver�������Լ����������ݸ�����������Щ�����������������Ϣ�ڵ���ִ�С�
�����������ӡ�XML���ļ����ݡ�
package
TestNG;
import org.openqa.selenium.remote.DesiredCapabilities;
import java.util.concurrent.TimeUnit;
import org.openqa.selenium.*;
import org.testng.annotations.AfterTest;
import org.testng.annotations.BeforeTest;
import org.testng.annotations.Parameters;
import org.testng.annotations.Test;
import java.net.URL;
import java.net.MalformedURLException;
import org.openqa.selenium.remote.RemoteWebDriver;
public class TestNGClass
{
public WebDriver driver;
public String URL, Node;
protected ThreadLocal<RemoteWebDriver>
threadDriver = null;
@Parameters("browser")
@BeforeTest
public void launchapp(String browser) throws
MalformedURLException
{
String URL = "http://www.calculator.net";
if (browser.equalsIgnoreCase("firefox"))
{
System.out.println(" Executing on FireFox");
String Node = "http://10.112.66.52:5555/wd/hub";
DesiredCapabilities cap = DesiredCapabilities.firefox();
cap.setBrowserName("firefox");
driver = new RemoteWebDriver(new URL(Node),
cap);
//Puts a Implicit wait, Will wait for 10
seconds before throwing exception
driver.manage().timeouts().implicitlyWait(10,
TimeUnit.SECONDS);
//Launch website
driver.navigate().to(URL);
driver.manage().window().maximize();
}
else if (browser.equalsIgnoreCase("chrome"))
{
System.out.println(" Executing on CHROME");
DesiredCapabilities cap = DesiredCapabilities.chrome();
cap.setBrowserName("chrome");
String Node = "http://10.112.66.52:5557/wd/hub";
driver = new RemoteWebDriver(new URL(Node),
cap);
driver.manage().timeouts().implicitlyWait(10,
TimeUnit.SECONDS);
//Launch website
driver.navigate().to(URL);
driver.manage().window().maximize();
}
else if (browser.equalsIgnoreCase("ie"))
{
System.out.println(" Executing on IE");
DesiredCapabilities cap = DesiredCapabilities.chrome();
cap.setBrowserName("ie");
String Node = "http://10.112.66.52:5558/wd/hub";
driver = new RemoteWebDriver(new URL(Node),
cap);
driver.manage().timeouts().implicitlyWait(10,
TimeUnit.SECONDS);
//Launch website
driver.navigate().to(URL);
driver.manage().window().maximize();
}
else
{
throw new IllegalArgumentException("The
Browser Type is Undefined");
}
}
@Test
public void calculatepercent()
{
driver.findElement(By.xpath(".//*[@id='menu']/div[3]/a")).click();
// Click on Math Calculators
driver.findElement(By.xpath(".//*[@id='menu']/div[4]/div[3]/a")).click();
// Click on Percent Calculators
driver.findElement(By.id("cpar1")).sendKeys("10");
// Enter value 10 in the first number of
the percent Calculator
driver.findElement(By.id("cpar2")).sendKeys("50");
// Enter value 50 in the second number of
the percent Calculator
driver.findElement(By.xpath(".//*[@id='content']/table/tbody/tr/td[2]/input")).click();
// Click Calculate Button
String result = driver.findElement(By.xpath(".//*[@id='content']/p[2]/span/font/b")).getText();
// Get the Result Text based on its xpath
System.out.println(" The Result is
" + result); //Print a Log In message
to the screen
if(result.equals("5"))
{
System.out.println(" The Result is
Pass");
}
else
{
System.out.println(" The Result is
Fail");
}
}
@AfterTest
public void closeBrowser()
{
driver.quit();
}
} |
����2����������еIJ�����ʹ��XML�����ݡ�������Ҫ����Ŀ�ļ��д�����ͬ��XML��
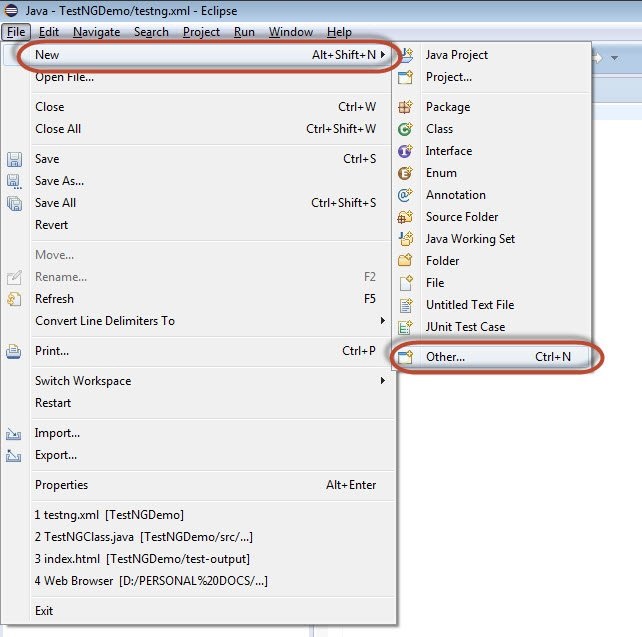
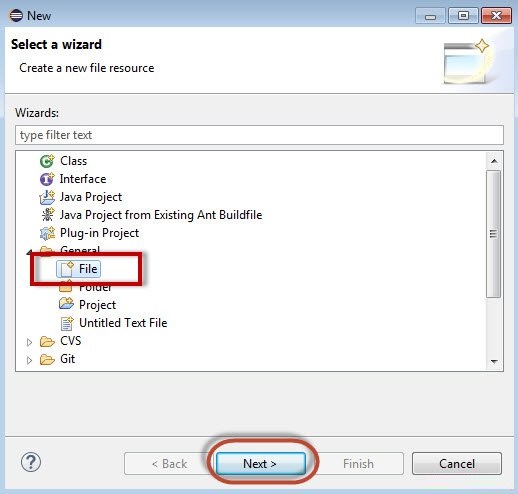
����3���ӡ�General����ѡ��File����Ȼ������Next����
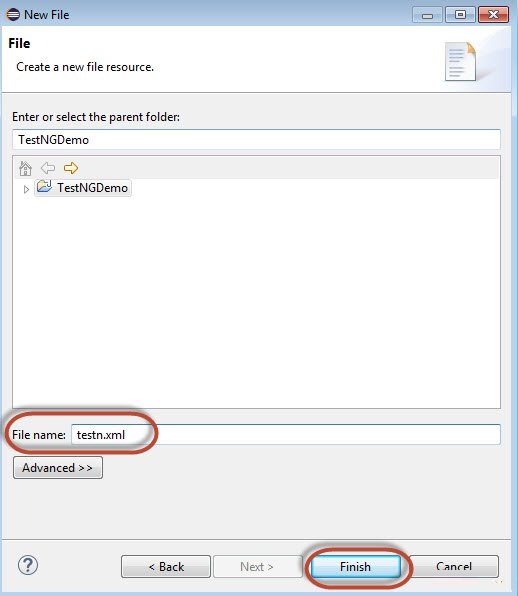
��4���������ļ������ƣ�Ȼ����Finish����
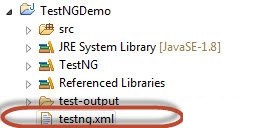
��5����testng.xml�ļ��Ǹ�����Ŀ�ļ����д�������ͼ��ʾ��
����6��XML������������ʾ�����Ǵ���3�����ԣ�������������parallel="tests"�������еIJ��Բ���ִ�С�
<?xml
version="1.0" encoding="UTF-8"?>
<!DOCTYPE suite SYSTEM "http://testng.org/testng-1.0.dtd">
<suite name="Suite" parallel="tests">
<test name="FirefoxTest">
<parameter name="browser" value="firefox"
/>
<classes>
<class name="TestNG.TestNGClass"
/>
</classes>
</test>
<test name="ChromeTest">
<parameter name="browser" value="chrome"
/>
<classes>
<class name="TestNG.TestNGClass"
/>
</classes>
</test>
<test name="IETest">
<parameter name="browser" value="ie"
/>
<classes>
<class name="TestNG.TestNGClass"
/>
</classes>
</test>
</suite> |
����ִ��
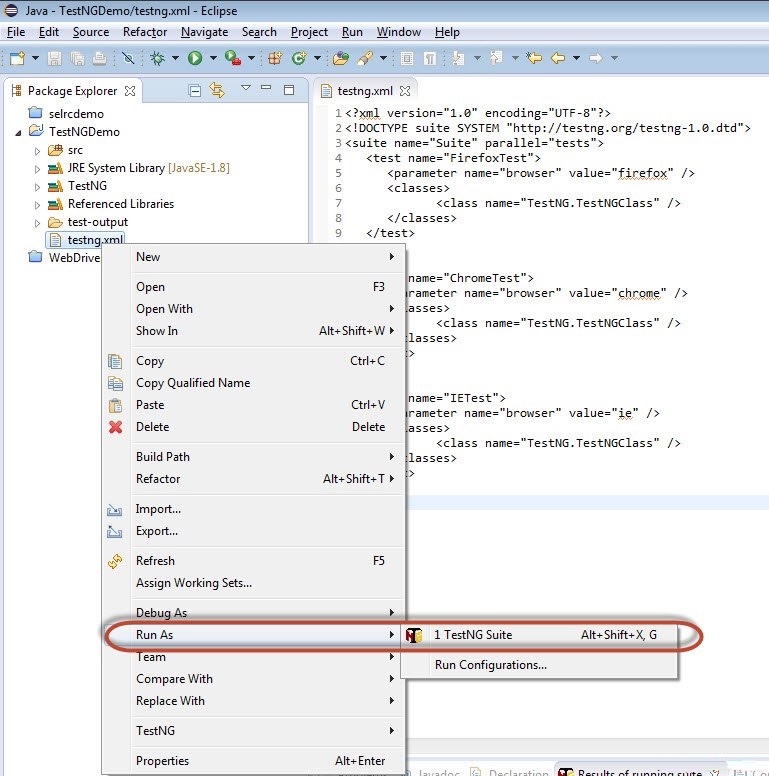
��1����ѡ����XML��ִ���Ҽ�������ѡ�� 'Run As' >> 'TestNG
Suite'
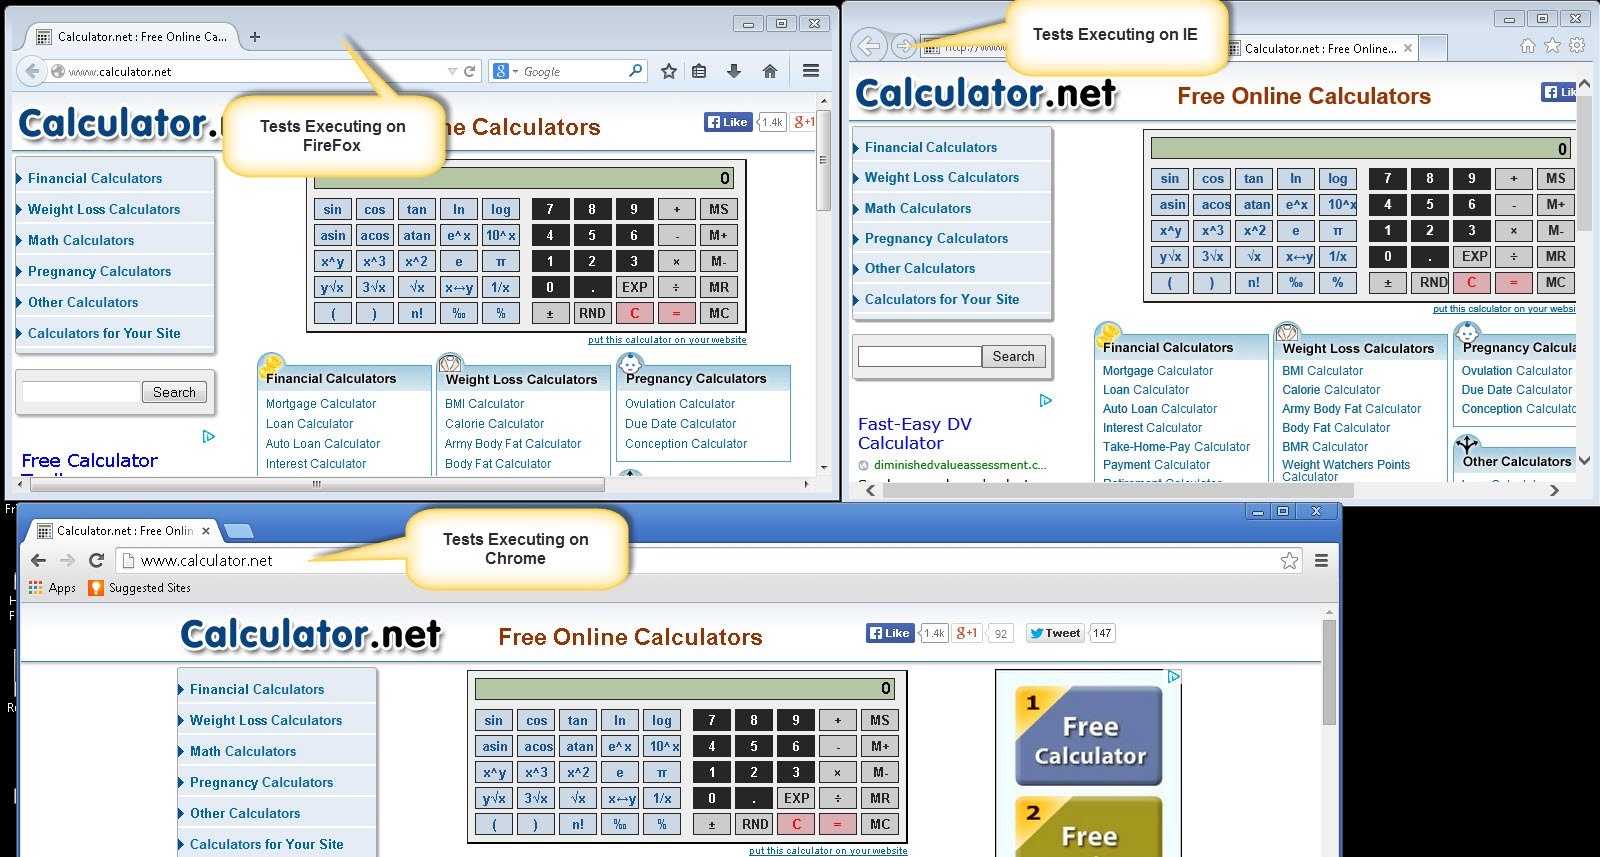
��2�������ڴĽڵ㣬�����������Ƴ�������������ڵ㡣���ǽ��ܹ�ͬʱ�������������������ִ�С�
�������
����1�������ִ��ʱ�����ǽ��ܹ������Ľ�����κ�����ִ�С�������ܴ�ӡ�ڿ���̨����������ͬ�Ŀ��ա�
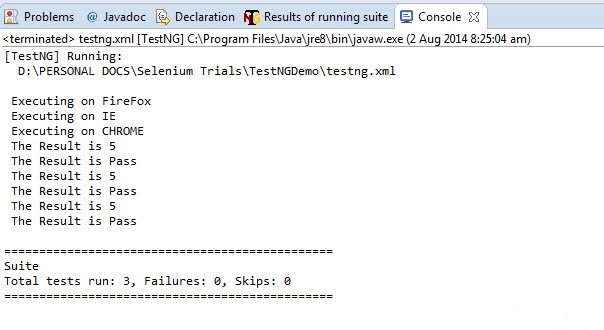
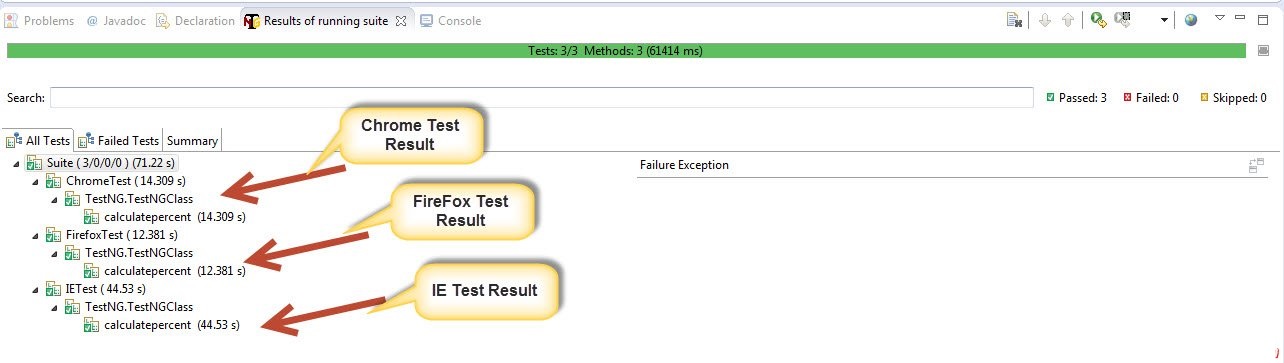
��2����������ѡ���TestNG����ʾ���ժҪ����ͼ��ʾ��Results of Running
Suite����
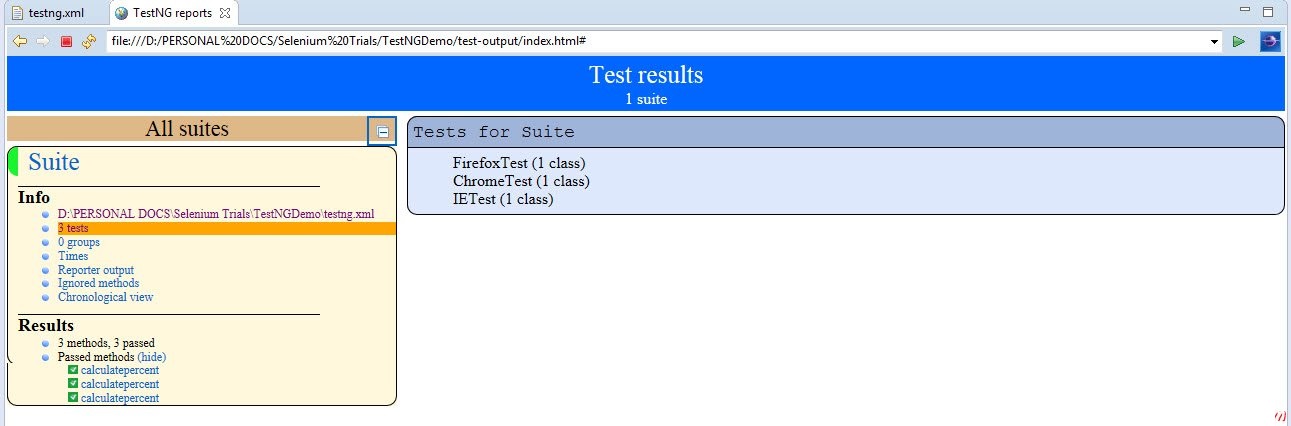
����3�������ɵ�HTML�У����ǽ��ܹ�����HTML��ʽ�IJ��Խ����
|