|
Android Android的Toast 类提供了一个方便的方式来显示用户的警告信息,但这些警告不是持久性的,这意味着警告闪烁在屏幕上几秒钟后就消失了。
对于特别重要的要提供给用户的消息,需要有更持久性的方法。 Anotification是一种消息可以显示在设备的顶部的通知栏或状态栏中。

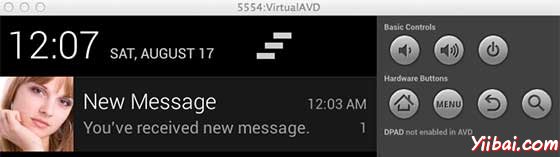
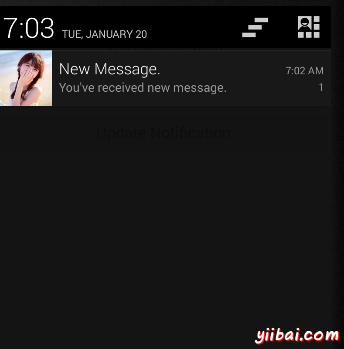
要看到通知的细节,选择图标显示通知抽屉里有详细的有关通知。模拟器虚拟设备工作,按一下向下拖动状态栏将它展开,将显示详细信息如下。这将是64 sp高的普通视图。
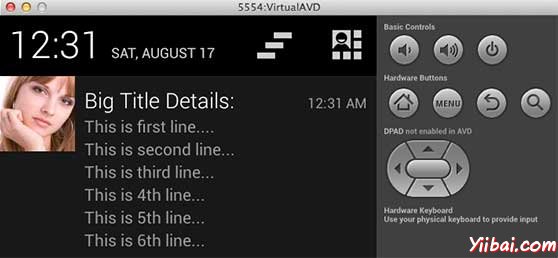
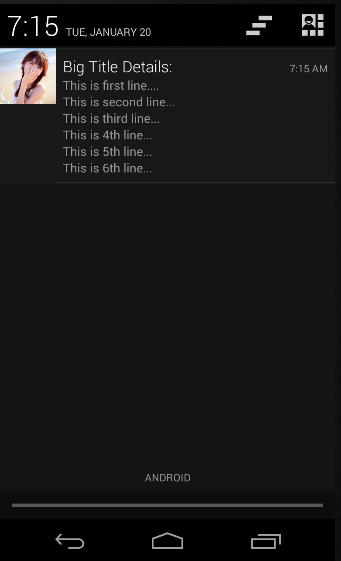
上述扩大的形式可以放到一个大的视图,有关通知的更多细节。可以添加最多六行的通知。下面的截图显示了这样的通知。
创建和发送通知
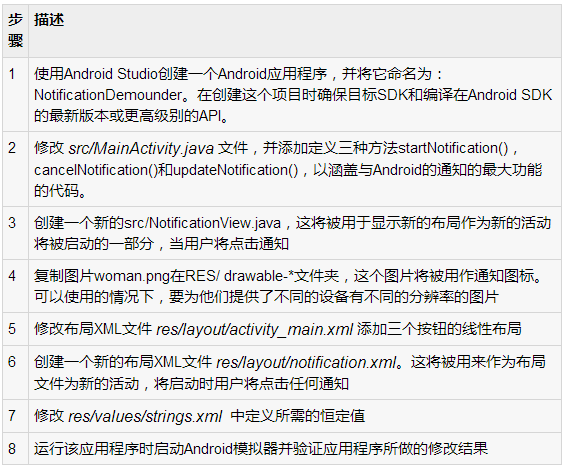
使用简单的方法来创建一个通知。按照以下步骤在应用程序创建一个通知:
第1步 - 创建通知生成器
作为第一步创建一个通知构造器,使用NotificationCompat.Builder.build()。使用通知Builder来设置属性,如各种通知其小型和大型图标,标题,优先级等。
NotificationCompat.Builder mBuilder = new NotificationCompat.Builder(this) |
第2步 - 设置通知属性
-
一个小图标,由?setSmallIcon()?设置
-
一个标题,由setContentTitle() 设置
-
详细内容由 setContentText() 设置
mBuilder.setSmallIcon(R.drawable.notification_icon);
    mBuilder.setContentTitle("Notification Alert, Click Me!");
mBuilder.setContentText("Hi, This is Android Notification Detail!"); |
通知有很多可选的属性,可以设置。要更多地了解它们,请参考 NotificationCompat.Builder 文档。
第3步 - 动作附加
这是一个可选的部分,并要求如果要附加一个动作的通知。动作可以让用户直接从通知到应用程序中的活动,在那里它们可以在一个或多个事件,或做进一步的工作。
动作定义通过PendingIntent 在应用程序中的活动意图。要关联PendingIntent 手势请调用适当NotificationCompat.Builder 方法。例如,如果想开始活动,当用户点击通知文本通知抽屉 PendingIntent 调用setContentIntent()。
PendingIntent对象表示应用程序的执行一个动作,在以后的时间里查看应用程序是否正在运行。
堆栈builder对象将包含一个人工后退堆栈活动。确保向后导航的活动在应用程序的主屏幕。
Intent resultIntent = new Intent(this, ResultActivity.class);
    TaskStackBuilder stackBuilder = TaskStackBuilder.create(this);
    stackBuilder.addParentStack(ResultActivity.class);
    // Adds the Intent that starts the Activity to the top of the stack
   stackBuilder.addNextIntent(resultIntent);
   PendingIntent resultPendingIntent =
          stackBuilder.getPendingIntent(
              0,
              PendingIntent.FLAG_UPDATE_CURRENT
          );
mBuilder.setContentIntent(resultPendingIntent); |
第4步 - 发出通知
最后,调用NotificationManager.notify() 发送通知,通知对象传递到系统。通知之前,确保调用NotificationCompat.Builder.build()方法生成器对象。这种方法结合了所有的选择,设置并返回一个新的Notificationobject。
NotificationManager mNotificationManager =
        (NotificationManager) getSystemService(Context.NOTIFICATION_SERVICE);
    // notificationID allows you to update the notification later on.
mNotificationManager.notify(notificationID, mBuilder.build()); |
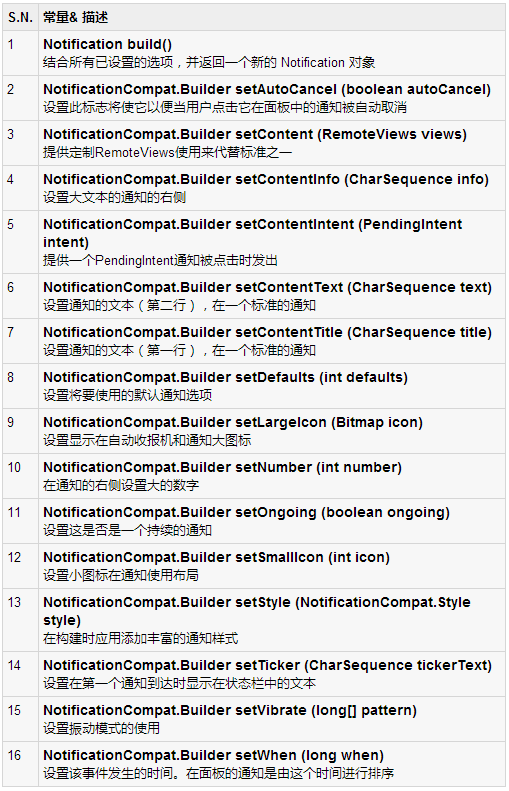
NotificationCompat.Builder类
NotificationCompat.Builder类可以更容易控制标志,以及帮助构建典型通知布局。以下是 NotificationCompat.Builder类的一些重要的和最常用的方法的一部分。
示例
以下示例显示 Android 的通知功能,NotificationCompat.Builder类已在Android4.1中引入。
以下是修改主要活动文件src/com.yiibai.notificationdemo/MainActivity.java 的内容。这个文件可以包括每个生命周期基本方法。
package com.example.notificationdemo;
    import android.os.Bundle;
    import android.app.Activity;
    import android.app.NotificationManager;
    import android.app.PendingIntent;
    import android.app.TaskStackBuilder;
    import android.content.Context;
    import android.content.Intent;
    import android.support.v4.app.NotificationCompat;
    import android.util.Log;
    import android.view.View;
    import android.widget.Button;
    public class MainActivity extends Activity {
        private NotificationManager mNotificationManager;
        private int notificationID = 100;
        private int numMessages = 0;

        protected void onCreate(Bundle savedInstanceState) {
            super.onCreate(savedInstanceState);
            setContentView(R.layout.activity_main);
            Button startBtn = (Button) findViewById(R.id.start);
            startBtn.setOnClickListener(new View.OnClickListener() {
                public void onClick(View view) {
                  displayNotification();
           }
        });

           Button cancelBtn = (Button) findViewById(R.id.cancel);
           cancelBtn.setOnClickListener(new View.OnClickListener() {
           public void onClick(View view) {
              cancelNotification();
           }
        });
           Button updateBtn = (Button) findViewById(R.id.update);
           updateBtn.setOnClickListener(new View.OnClickListener() {
           public void onClick(View view) {
              updateNotification();
           }
        });
     }
   protected void displayNotification() {
        Log.i("Start", "notification");
        /* Invoking the default notification service */
        NotificationCompat.Builder  mBuilder =
        new NotificationCompat.Builder(this);

        mBuilder.setContentTitle("New Message");
        mBuilder.setContentText("You've received new message.");
        mBuilder.setTicker("New Message Alert!");
        mBuilder.setSmallIcon(R.drawable.woman);

        /* Increase notification number every time a new notification arrives */
        mBuilder.setNumber(++numMessages);

        /* Creates an explicit intent for an Activity in your app */
        Intent resultIntent = new Intent(this, NotificationView.class);

        TaskStackBuilder stackBuilder = TaskStackBuilder.create(this);
        stackBuilder.addParentStack(NotificationView.class);

        /* Adds the Intent that starts the Activity to the top of the stack */
        stackBuilder.addNextIntent(resultIntent);
        PendingIntent resultPendingIntent =
           stackBuilder.getPendingIntent(
              0,
              PendingIntent.FLAG_UPDATE_CURRENT
           );

        mBuilder.setContentIntent(resultPendingIntent);
        mNotificationManager =
        (NotificationManager) getSystemService(Context.NOTIFICATION_SERVICE);
        /* notificationID allows you to update the notification later on. */
        mNotificationManager.notify(notificationID, mBuilder.build());
     }

     protected void cancelNotification() {
        Log.i("Cancel", "notification");
        mNotificationManager.cancel(notificationID);
     }

     protected void updateNotification() {
        Log.i("Update", "notification");

        /* Invoking the default notification service */
        NotificationCompat.Builder  mBuilder =
        new NotificationCompat.Builder(this);

        mBuilder.setContentTitle("Updated Message");
        mBuilder.setContentText("You've got updated message.");
        mBuilder.setTicker("Updated Message Alert!");
        mBuilder.setSmallIcon(R.drawable.woman);

       /* Increase notification number every time a new notification arrives */
        mBuilder.setNumber(++numMessages);

        /* Creates an explicit intent for an Activity in your app */
        Intent resultIntent = new Intent(this, NotificationView.class);

        TaskStackBuilder stackBuilder = TaskStackBuilder.create(this);
        stackBuilder.addParentStack(NotificationView.class);

        /* Adds the Intent that starts the Activity to the top of the stack */
        stackBuilder.addNextIntent(resultIntent);
        PendingIntent resultPendingIntent =
           stackBuilder.getPendingIntent(
              0,
              PendingIntent.FLAG_UPDATE_CURRENT
           );

        mBuilder.setContentIntent(resultPendingIntent);
        mNotificationManager =
        (NotificationManager) getSystemService(Context.NOTIFICATION_SERVICE);
        /* Update the existing notification using same notification ID */
        mNotificationManager.notify(notificationID, mBuilder.build());
     }
} |
以下是修改的主活动文件的内容 src/com.yiibai.notificationdemo/NotificationView.java.
package com.example.notificationdemo;
    import android.os.Bundle;
    import android.app.Activity;
    public class NotificationView extends Activity{
       @Override
       public void onCreate(Bundle savedInstanceState)
     {
         super.onCreate(savedInstanceState);
         setContentView(R.layout.notification);
     }
} |
下面文件 res/layout/activity_main.xml 的内容如下:
<LinearLayout xmlns:android="http://schemas.android.com/apk/res/android"
       android:layout_width="fill_parent"
       android:layout_height="fill_parent"
       android:orientation="vertical" >
       <Button android:id="@+id/start"
       android:layout_width="fill_parent"
       android:layout_height="wrap_content"
       android:text="@string/start_note"/>
       <Button android:id="@+id/cancel"
       android:layout_width="fill_parent"
       android:layout_height="wrap_content"
       android:text="@string/cancel_note" />
       <Button android:id="@+id/update"
       android:layout_width="fill_parent"
       android:layout_height="wrap_content"
       android:text="@string/update_note" />
</LinearLayout> |
下面是 res/layout/notification.xml 文件的内容:
<?xml version="1.0" encoding="utf-8"?>
<LinearLayout xmlns:android="http://schemas.android.com/apk/res/android"
android:orientation="vertical"
android:layout_width="fill_parent"
android:layout_height="fill_parent" >
<TextView
android:layout_width="fill_parent"
android:layout_height="400dp"
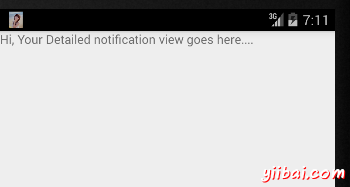
android:text="Hi, Your Detailed notification view goes here...." />
</LinearLayout> |
下面文件 res/values/strings.xml 的内容中定义两个新的常量:
<?xml version="1.0" encoding="utf-8"?>
    <resources>
        <string name="app_name">NotificationDemo</string>
        <string name="action_settings">Settings</string>
        <string name="hello_world">Hello world!</string>
        <string name="start_note">Start Notification</string>
        <string name="cancel_note">Cancel Notification</string>
        <string name="update_note">Update Notification</string>
</resources> |
下面是 AndroidManifest.xml 文件的内容:
<?xml version="1.0" encoding="utf-8"?>
    <manifest xmlns:android="http://schemas.android.com/apk/res/android"
         package="com.yiibai.notificationdemo"
         android:versionCode="1"
         android:versionName="1.0" >
        <uses-sdk
           android:minSdkVersion="17"
           android:targetSdkVersion="17" />

      <application
          android:allowBackup="true"
          android:icon="@drawable/ic_launcher"
          android:label="@string/app_name"
          android:theme="@style/AppTheme" >
          <activity
              android:name="com.yiibai.notificationdemo.MainActivity"
              android:label="@string/app_name" >
              <intent-filter>
                  <action android:name="android.intent.action.MAIN" />

                  <category android:name="android.intent.category.LAUNCHER" />
              </intent-filter>
          </activity>
          <activity android:name=".NotificationView"
               android:label="Details of notification"
               android:parentActivityName=".MainActivity">
         <meta-data
          android:name="android.support.PARENT_ACTIVITY"
          android:value=".MainActivity"/>
          </activity>
      </application>
</manifest> |
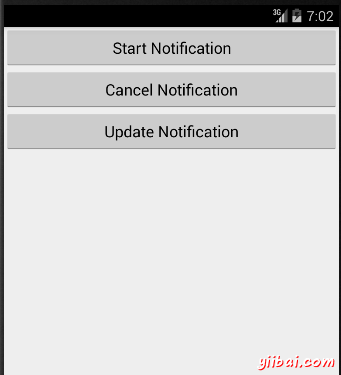
我们尝试运行NotificationDemo 应用程序。AVD安装的应用程序,并启动它,如果一切设置和应用都没有问题,它会显示以下模拟器窗口:
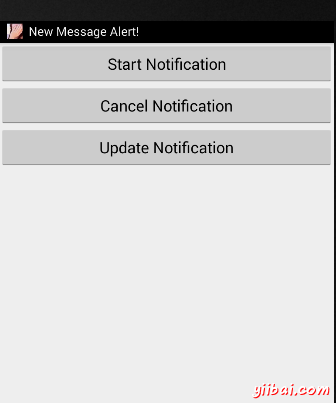
现在单击“Start Notification”通知按钮,会看到在上面的一条消息“New Message Alert!”将短暂显示后,将有下面的屏幕左上角有一个小图标。
现在,让我们展开视图,长按小图标,一秒钟后它会显示日期信息,这是时间的时候,应该释放鼠标拖动状态栏的情况下。会看到状态栏将扩大,会得到以下画面:
现在,让我们尝试在图像上点击图标,这将启动新的活动,已设置使用的意图,将有以下屏幕:
接下来,可以点击“Detail of notification”,将带回到主屏幕,可以尝试使用更新通知按钮,将更新现有的通知和数量将增加1,但如果发送通知,新的通知ID会继续增加在堆栈中,会看到他们在屏幕上单独列示
图查看大图通知
下面的代码片断演示了如何改变的通知,上面代码中创建使用收件箱大视图样式。要更新 displayNotification() 方法来显示这个功能:
protected void displayNotification() {
        Log.i("Start", "notification");
        /* Invoking the default notification service */
        NotificationCompat.Builder  mBuilder =
        new NotificationCompat.Builder(this);

        mBuilder.setContentTitle("New Message");
        mBuilder.setContentText("You've received new message.");
        mBuilder.setTicker("New Message Alert!");
        mBuilder.setSmallIcon(R.drawable.woman);

        /* Increase notification number every time a new notification arrives */
        mBuilder.setNumber(++numMessages);
        /* Add Big View Specific Configuration */
        NotificationCompat.InboxStyle inboxStyle =
               new NotificationCompat.InboxStyle();

        String[] events = new String[6];
        events[0] = new String("This is first line....");
        events[1] = new String("This is second line...");
        events[2] = new String("This is third line...");
        events[3] = new String("This is 4th line...");
        events[4] = new String("This is 5th line...");
        events[5] = new String("This is 6th line...");

        // Sets a title for the Inbox style big view
        inboxStyle.setBigContentTitle("Big Title Details:");
        // Moves events into the big view
        for (int i=0; i < events.length; i++) {
             inboxStyle.addLine(events[i]);
        }
        mBuilder.setStyle(inboxStyle);

         /* Creates an explicit intent for an Activity in your app */
        Intent resultIntent = new Intent(this, NotificationView.class);

        TaskStackBuilder stackBuilder = TaskStackBuilder.create(this);
        stackBuilder.addParentStack(NotificationView.class);

        /* Adds the Intent that starts the Activity to the top of the stack */
        stackBuilder.addNextIntent(resultIntent);
        PendingIntent resultPendingIntent =
           stackBuilder.getPendingIntent(
              0,
              PendingIntent.FLAG_UPDATE_CURRENT
           );
       mBuilder.setContentIntent(resultPendingIntent);

       mNotificationManager =
       (NotificationManager) getSystemService(Context.NOTIFICATION_SERVICE);

       /* notificationID allows you to update the notification later on. */
        mNotificationManager.notify(notificationID, mBuilder.build());
     }
|
现在,如果尝试运行应用程序,然后会发现下面的结果视图的扩展形式:
|