|
内容提供程序(Provider)组件从一个应用到其他请求提供数据。通过 ContentResolver 类的方法这样的请求处理。内容提供程序使用不同的方式来存储数据,并且可以将数据存储在数据库中,文件中,甚至在网络上。
每一个 Android 应用程序运行在自己的进程保持一个应用程序数据,在另外一个应用程序中隐藏自己的权限。但有时需要在应用程序之间共享数据。这时内容提供程序是非常有用。
内容提供程序将内容集中在一个地方,让许多不同的应用访问。内容提供程序的行非常像数据库,可以对它进行查询,编辑等操作,添加或删除可使用 insert(), update(), delete(), query() 方法。在大多数情况下,这些数据都存储在SQlite数据库。
内容提供程序实施 ContentProvider 类的子类,必须实现了一套标准的 API,使其他应用程序来执行事务。
public class MyContentProvider extends  ContentProvider {
} |
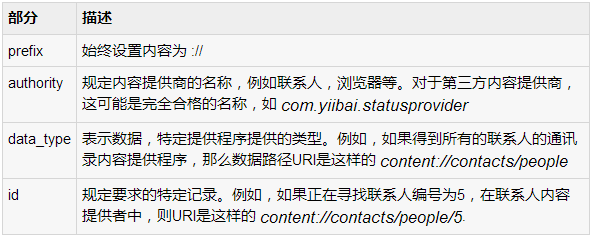
内容的URI
要查询内容提供程序,可以指定 URI 形式如以下格式的查询字符串:
<prefix>://<authority>/<data_type>/<id> |
这里是URI的各个部分的细节
创建内容提供者
以下是简单的步骤用来创建自己的内容提供者的数量。
-
首先,需要创建一个内容提供者扩展 ContentProvider?基类。
-
其次,需要定义内容提供者用于访问内容的 URI 地址。
-
接下来,需要创建自己的数据库用于保存内容。通常情况下,Android使用SQLite数据库,并且框架需要重写 onCreate() 方法会使用 SQLite开放的 Helper方法来创建或打开提供者数据库。当启动应用程序时,每个内容提供者的onCreate()方法调用处理程序在主应用程序。
-
接下来,必须实现内容提供者查询来执行不同的数据库的具体操作。
-
最后,在activity文件使用<provider>标签注册内容提供者。
下面是需要覆盖内容提供程序类的方法的列表:
-
onCreate()?方法被称为提供者开始。
-
query()?方法接收来自客户端的请求。返回的结果作为一个Cursor对象。
-
insert()?方法插入一条新记录到内容提供者。
-
delete()?方法从内容提供者删除记录。
-
update()?方法从内容提供者更新现有记录。
-
getType()?此方法在给定的URI返回 MIME 类型的数据。
示例
这个例子将解释如何创建自己的 ContentProvider。因此按照下面的步骤类似于我们之前创建Hello World范例:

以下是主活动文件 src/com.example.mycontentprovider/MainActivity.java 修改后的内容。这个文件可以包括每个生命周期方法。我们已经增加了两个新方法onClickAddName() 和 onClickRetrieveStudents() 来处理用户与应用程序交互。
package com.example.mycontentprovider;
    import android.net.Uri;
    import android.os.Bundle;
    import android.app.Activity;
    import android.content.ContentValues;
    import android.content.CursorLoader;
    import android.database.Cursor;
    import android.view.Menu;
    import android.view.View;
    import android.widget.EditText;
    import android.widget.Toast;
    public class MainActivity extends Activity {
       @Override
       protected void onCreate(Bundle savedInstanceState) {
           super.onCreate(savedInstanceState);
           setContentView(R.layout.activity_main);
      }
       @Override
       public boolean onCreateOptionsMenu(Menu menu) {
          getMenuInflater().inflate(R.menu.main, menu);
          return true;
     }
       public void onClickAddName(View view) {
        // Add a new student record
        ContentValues values = new ContentValues();
          values.put(StudentsProvider.NAME,
         ((EditText)findViewById(R.id.txtName)).getText().toString());
                values.put(StudentsProvider.GRADE,
         ((EditText)findViewById(R.id.txtGrade)).getText().toString());
          Uri uri = getContentResolver().insert(
        StudentsProvider.CONTENT_URI, values);
                Toast.makeText(getBaseContext(),
         uri.toString(), Toast.LENGTH_LONG).show();
     }
       public void onClickRetrieveStudents(View view) {
        // Retrieve student records
        String URL = "content://com.example.provider.College/students";
        Uri students = Uri.parse(URL);
        Cursor c = managedQuery(students, null, null, null, "name");
        if (c.moveToFirst()) {
           do{
              Toast.makeText(this,
               c.getString(c.getColumnIndex(StudentsProvider._ID)) +
               ", " +  c.getString(c.getColumnIndex( StudentsProvider.NAME)) +
              ", " + c.getString(c.getColumnIndex( StudentsProvider.GRADE)),
               Toast.LENGTH_SHORT).show();
            } while (c.moveToNext());
        }
     }
} |
在 com.example.mycontentprovider 包下创建新的 StudentsProvider.java 文件,以下是内容:
package com.example.mycontentprovider;
    import java.util.HashMap;
    import android.content.ContentProvider;
    import android.content.ContentUris;
    import android.content.ContentValues;
    import android.content.Context;
    import android.content.UriMatcher;
    import android.database.Cursor;
    import android.database.SQLException;
    import android.database.sqlite.SQLiteDatabase;
    import android.database.sqlite.SQLiteOpenHelper;
    import android.database.sqlite.SQLiteQueryBuilder;
    import android.net.Uri;
    import android.text.TextUtils;


    public class StudentsProvider extends ContentProvider {
       static final String PROVIDER_NAME = "com.example.provider.College";
       static final String URL = "content://" + PROVIDER_NAME + "/students";
       static final Uri CONTENT_URI = Uri.parse(URL);
       static final String _ID = "_id";
       static final String NAME = "name";
       static final String GRADE = "grade";
       private static HashMap<String, String> STUDENTS_PROJECTION_MAP;
       static final int STUDENTS = 1;
       static final int STUDENT_ID = 2;
       static final UriMatcher uriMatcher;
       static{
          uriMatcher = new UriMatcher(UriMatcher.NO_MATCH);
          uriMatcher.addURI(PROVIDER_NAME, "students", STUDENTS);
          uriMatcher.addURI(PROVIDER_NAME, "students/#", STUDENT_ID);
     }
     /**
      * Database specific constant declarations
      */
     private SQLiteDatabase db;
     static final String DATABASE_NAME = "College";
     static final String STUDENTS_TABLE_NAME = "students";
     static final int DATABASE_VERSION = 1;
     static final String CREATE_DB_TABLE =
         " CREATE TABLE " + STUDENTS_TABLE_NAME +
        " (_id INTEGER PRIMARY KEY AUTOINCREMENT, " +
         " name TEXT NOT NULL, " +
        " grade TEXT NOT NULL);";
       /**
      * Helper class that actually creates and manages
       * the provider's underlying data repository.
      */
     private static class DatabaseHelper extends SQLiteOpenHelper {
         DatabaseHelper(Context context){
            super(context, DATABASE_NAME, null, DATABASE_VERSION);
         }
         @Override
         public void onCreate(SQLiteDatabase db)
         {
            db.execSQL(CREATE_DB_TABLE);
         }
         @Override
         public void onUpgrade(SQLiteDatabase db, int oldVersion,
                                int newVersion) {
            db.execSQL("DROP TABLE IF EXISTS " +  STUDENTS_TABLE_NAME);
            onCreate(db);
         }
     }
   @Override
     public boolean onCreate() {
        Context context = getContext();
        DatabaseHelper dbHelper = new DatabaseHelper(context);
        /**
         * Create a write able database which will trigger its
          * creation if it doesn't already exist.
         */
        db = dbHelper.getWritableDatabase();
        return (db == null)? false:true;
     }
     @Override
     public Uri insert(Uri uri, ContentValues values) {
        /**
         * Add a new student record
         */
        long rowID = db.insert(	STUDENTS_TABLE_NAME, "", values);
       /**
          * If record is added successfully
         */
        if (rowID > 0)
        {
           Uri _uri = ContentUris.withAppendedId(CONTENT_URI, rowID);
           getContext().getContentResolver().notifyChange(_uri, null);
           return _uri;
        }
        throw new SQLException("Failed to add a record into " + uri);
     }
@Override
     public Cursor query(Uri uri, String[] projection, String selection,
	                         String[] selectionArgs, String sortOrder) {
                SQLiteQueryBuilder qb = new SQLiteQueryBuilder();
        qb.setTables(STUDENTS_TABLE_NAME);
                switch (uriMatcher.match(uri)) {
        case STUDENTS:
           qb.setProjectionMap(STUDENTS_PROJECTION_MAP);
           break;
        case STUDENT_ID:
           qb.appendWhere( _ID + "=" + uri.getPathSegments().get(1));
           break;
        default:
           throw new IllegalArgumentException("Unknown URI " + uri);
        }
        if (sortOrder == null || sortOrder == ""){
           /**
             * By default sort on student names
            */
           sortOrder = NAME;
        }
        Cursor c = qb.query(db,	projection,	selection, selectionArgs,
                             null, null, sortOrder);
        /**
          * register to watch a content URI for changes
         */
        c.setNotificationUri(getContext().getContentResolver(), uri);
          return c;
     }
   @Override
     public int delete(Uri uri, String selection,String[] selectionArgs) {
        int count = 0;
        switch (uriMatcher.match(uri)){
        case STUDENTS:
           count = db.delete(STUDENTS_TABLE_NAME, selection, selectionArgs);
           break;
        case STUDENT_ID:
           String id = uri.getPathSegments().get(1);
           count = db.delete( STUDENTS_TABLE_NAME, _ID +  " = " + id +
                   (!TextUtils.isEmpty(selection) ? " AND (" +
                   selection + ')' : ""), selectionArgs);
           break;
        default:
            throw new IllegalArgumentException("Unknown URI " + uri);
        }
        getContext().getContentResolver().notifyChange(uri, null);
        return count;
     }
    @Override
     public int update(Uri uri, ContentValues values, String selection,
                        String[] selectionArgs) {
        int count = 0;
        switch (uriMatcher.match(uri)){
        case STUDENTS:
           count = db.update(STUDENTS_TABLE_NAME, values,
                    selection, selectionArgs);
           break;
        case STUDENT_ID:
            count = db.update(STUDENTS_TABLE_NAME, values, _ID +
                    " = " + uri.getPathSegments().get(1) +
                    (!TextUtils.isEmpty(selection) ? " AND (" +
                   selection + ')' : ""), selectionArgs);
           break;
        default:
            throw new IllegalArgumentException("Unknown URI " + uri );
        }
        getContext().getContentResolver().notifyChange(uri, null);
        return count;
     }
   @Override
     public String getType(Uri uri) {
        switch (uriMatcher.match(uri)){
        /**
         * Get all student records
          */
        case STUDENTS:
           return "vnd.android.cursor.dir/vnd.example.students";
        /**
          * Get a particular student
         */
        case STUDENT_ID:
           return "vnd.android.cursor.item/vnd.example.students";
        default:
           throw new IllegalArgumentException("Unsupported URI: " + uri);
        }
     }
} |
以下将 AndroidManifest.xml 文件的内容修改。在这里添加了标签,包括内容提供者:
<?xml version="1.0" encoding="utf-8"?>
    <manifest xmlns:android="http://schemas.android.com/apk/res/android"
      package="com.example.mycontentprovider"
      android:versionCode="1"
      android:versionName="1.0" >
        <uses-sdk
          android:minSdkVersion="8"
          android:targetSdkVersion="17" />
        <application
          android:allowBackup="true"
          android:icon="@drawable/ic_launcher"
          android:label="@string/app_name"
          android:theme="@style/AppTheme" >
         <activity
              android:name="com.example.mycontentprovider.MainActivity"
              android:label="@string/app_name" >
              <intent-filter>
                  <action android:name="android.intent.action.MAIN" />
                  <category android:name="android.intent.category.LAUNCHER" />
              </intent-filter>
          </activity>
          <provider android:name="StudentsProvider"
              android:authorities="com.example.provider.College">
          </provider>
      </application>
</manifest> |
以下将 res/layout/activity_main.xml 文件的内容包括一个按钮来自定义广播意图:
<LinearLayout xmlns:android="http://schemas.android.com/apk/res/android"
      android:layout_width="fill_parent"
      android:layout_height="fill_parent"
      android:orientation="vertical" >
      <TextView
      android:layout_width="fill_parent"
      android:layout_height="wrap_content"
      android:text="Name" />
      <EditText
      android:id="@+id/txtName"
      android:layout_height="wrap_content"
      android:layout_width="fill_parent" />
      <TextView
      android:layout_width="fill_parent"
      android:layout_height="wrap_content"
      android:text="Grade" />
      <EditText
      android:id="@+id/txtGrade"
      android:layout_height="wrap_content"
      android:layout_width="fill_parent" />
      <Button
      android:text="Add Name"
      android:id="@+id/btnAdd"
      android:layout_width="fill_parent"
      android:layout_height="wrap_content"
      android:onClick="onClickAddName" />
      <Button
      android:text="Retrieve Students"
      android:id="@+id/btnRetrieve"
      android:layout_width="fill_parent"
      android:layout_height="wrap_content"
      android:onClick="onClickRetrieveStudents" />
</LinearLayout> |
确保 res/values/strings.xml 文件有以下内容:
<?xml version="1.0" encoding="utf-8"?>
    <resources>
        <string name="app_name">MyContentProvider</string>
      <string name="action_settings">Settings</string>
      <string name="hello_world">Hello world!</string>
</resources>; |
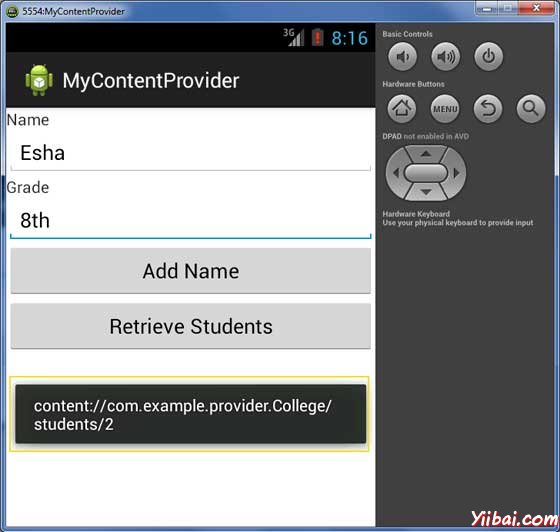
现在运行刚刚创建的应用程序 MyContentProvider。假设设置AVD并且已经做好了环境设置。要从Eclipse运行的应用程序,从工具栏打开一个项目的活动文件,并单击“Run” 图标。Eclipse AVD 安装的应用程序后并启动它,如果设置和应用程序没有问题,它会启动显示仿真器窗口(要耐心,可能有点慢,由你计算机的速度决定): 图标。Eclipse AVD 安装的应用程序后并启动它,如果设置和应用程序没有问题,它会启动显示仿真器窗口(要耐心,可能有点慢,由你计算机的速度决定):

现在输入学生姓名和年级,最后单击“Add Name”按钮,将增加学生记录到数据库中,ContentProvider URI也一起添加到数据库中,底部显示的记录数,并会闪烁一条消息。此操作使得我们的insert()方法的使用。让我们重复这个过程,我们的内容提供者在数据库中添加一些更多的学生信息。
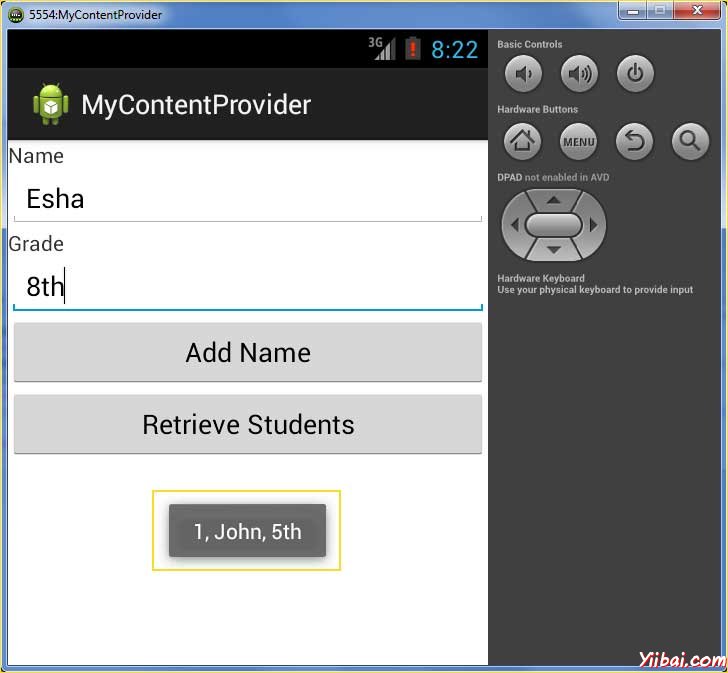
正在添加记录在数据库中,现在其时间让ContentProvider来给我们这些记录回,所以让我们的单击检索学生按钮,这将获取并显示所有记录这是按照我们执行query()方法
可以编写活动 MainActivity.java文件提供的回调函数,然后修改用户界面,更新和删除操作按钮添加和读操作以同样的方式,因为我们已经做了更新和删除操作。
通过这种方式,可以使用现有的内容提供者,如地址簿,或不错的面向数据库应用开发,可以使用内容提供者的概念,可以执行所有的数据库操作,如排序读,写,更新和删除上面的例子中解释。
|