|
每一个Android设备特别是手机都提供一个拨打电话功能,但仍然需要编写一个应用程序,给用户一个选择使用硬编码的电话号码拨打电话。
本章列出了一个简单的步骤来创建一个应用程序,它可以用来拨打电话。使用 Android 的 Intent 通过调用Android内置的电话通话功能。以下部分说明 Intent 对象的拨打电话功能。
Intent 对象 - 操作拨打电话
使用 ACTION_CALL 动作触发Android设备内置电话功能。以下是简单的语法用来创建一个Intent 的 ACTION_CALL 动作
Intent phoneIntent = new Intent(Intent.ACTION_CALL); |
可以使用 ACTION_DIAL 动作,而不是 ACTION_CALL,在这种情况下,在使用选项来修改硬编码的电话号码拨打电话之前,而不是直接调用的。
Intent 对象 - 数据/电话呼叫类型
这里给定电话为 13800138000 拨打一个电话,需要使用setData()方法指定URI为 tel:如下:
phoneIntent.setData(Uri.parse("tel:13800138000")); |
示例
下面的示例演示如何在实际使用 Android Intent 打电话给定的手机号码。
要尝试这个例子中,需要实际配备了最新的 Android OS 移动设备,否则仿真器可能无法正常工作。 |
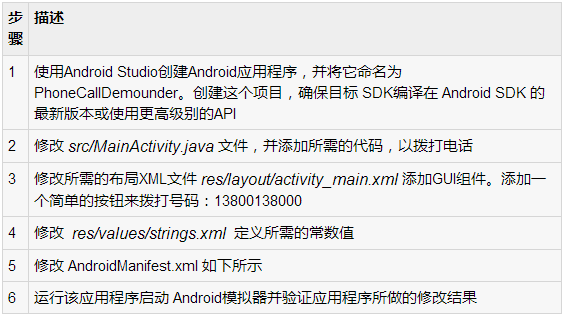
以下是修改主活动文件 src/com.yiibai.phonecalldemo/MainActivity.java 的内容如下:
要尝试这个例子中,需要实际配备了最新 Android OS 的移动设备,否则仿真器可能无法正常工作。 |
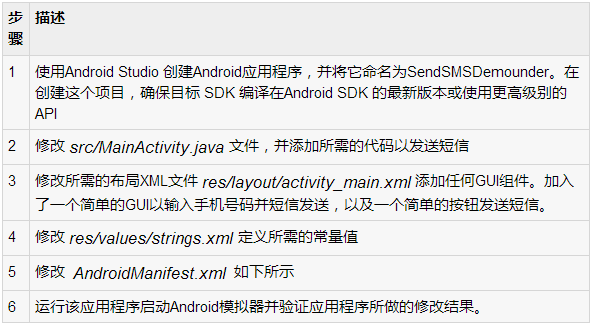
以下是修改的主活动文件 src/com.yiibai.sendsmsdemo/MainActivity.java 的内容
package com.yiibai.phonecalldemo;
    import android.net.Uri;
    import android.os.Bundle;
    import android.app.Activity;
    import android.content.Intent;
    import android.util.Log;
    import android.view.Menu;
    import android.view.View;
    import android.widget.Button;
    import android.widget.Toast;
    public class MainActivity extends Activity {
       @Override
       protected void onCreate(Bundle savedInstanceState) {
           super.onCreate(savedInstanceState);
           setContentView(R.layout.activity_main);
           Button startBtn = (Button) findViewById(R.id.makeCall);
           startBtn.setOnClickListener(new View.OnClickListener() {
                public void onClick(View view) {
                makeCall();
        }
     });
     }
     protected void makeCall() {
        Log.i("Make call", "");
          Intent phoneIntent = new Intent(Intent.ACTION_CALL);
          phoneIntent.setData(Uri.parse("tel:91-800-001-0101"));
          try {
               startActivity(phoneIntent);
               finish();
           Log.i("Finished making a call...", "");
          } catch (android.content.ActivityNotFoundException ex) {
           Toast.makeText(MainActivity.this,
            "Call faild, please try again later.", Toast.LENGTH_SHORT).show();
        }
     }
        @Override
        public boolean onCreateOptionsMenu(Menu menu) {
        // Inflate the menu; this adds items to the action bar if it is present.
        getMenuInflater().inflate(R.menu.main, menu);
        return true;
     }
} |
下面是 res/layout/activity_main.xml 文件的内容:
<LinearLayout xmlns:android="http://schemas.android.com/apk/res/android"
       android:layout_width="fill_parent"
       android:layout_height="fill_parent"
       android:orientation="vertical" >
       <Button android:id="@+id/makeCall"
       android:layout_width="fill_parent"
       android:layout_height="wrap_content"
       android:text="@string/make_call"/>
</LinearLayout> |
下面文件 res/values/strings.xml 的内容中定义两个新的常量:
<?xml version="1.0" encoding="utf-8"?>
    <resources>
        <string name="app_name">PhoneCallDemo</string>
        <string name="hello_world">Hello world!</string>
        <string name="action_settings">Settings</string>
        <string name="make_call">Call 91-800-001-0101</string>
</resources> |
以下是AndroidManifest.xml 文件的默认内容:
<?xml version="1.0" encoding="utf-8"?>
    <manifest xmlns:android="http://schemas.android.com/apk/res/android"
        package="com.yiibai.phonecalldemo"
        android:versionCode="1"
        android:versionName="1.0" >
        <uses-sdk
            android:minSdkVersion="8"
            android:targetSdkVersion="17" />
       <uses-permission android:name="android.permission.CALL_PHONE" />
       <uses-permission android:name="android.permission.READ_PHONE_STATE" />
       <application
           android:allowBackup="true"
           android:icon="@drawable/ic_launcher"
           android:label="@string/app_name"
           android:theme="@style/AppTheme" >
          <activity
              android:name="com.yiibai.phonecalldemo.MainActivity"
              android:label="@string/app_name" >
              <intent-filter>
                  <action android:name="android.intent.action.MAIN" />
                    <category android:name="android.intent.category.LAUNCHER" />
              </intent-filter>
          </activity>
      </application>
</manifest> |
我们尝试运行PhoneCallDemo 应用程序。Eclipse AVD安装的应用程序,并启动它,如果一切设置和应用代码都没有问题,它会显示以下模拟器窗口:

选择移动设备作为一个选项,然后检查移动设备,这将显示以下画面:
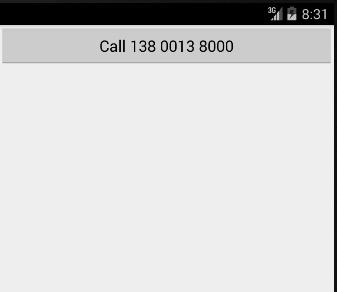
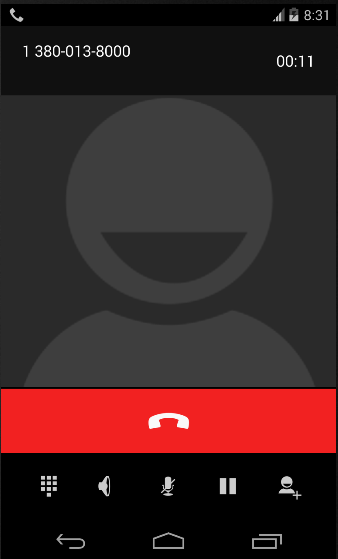
现在使用按钮拨打138001380000,如下所示:
|