Kubernetes容器连接模型
既然已经有了一个可持续运行的、可复制的应用,现在就可以在网络中将它暴露出来了。在讨论Kubernetes的网络连接方式之前,很值得和Docker的常规网络连接方式做个对比。
Dokcer默认使用私有网络连接方式,所以只有在同一台物理机器上的容器之前才可以通信。为了能让Docker容器可以跨节点通信,必须要给机器的IP地址分配端口号,这个端口之后会被用来转发或者路由给容器。很明显,这意味着容器要么很小心地协调使用端口,要么有动态分配地端口。
在一定的规模下,为多个开发者协调端口号非常困难。这也会把集群级别的问题暴露给用户,这是在用户的控制之外的。Kubernetes假定pods之间是可以通信的,不管它们落到哪个主机上。我们给每个pod指定集群私有的IP地址(cluster-private-IP
address),所以不需要显示地创建pod之间的链接,也不需要映射容器的端口到主机的端口。这意味着pod里的容器可以在本机(localhost)上访问各自的端口,而且在没有NAT的情况下,集群中所有的pod也可以互相可见的。本文剩下的内容将会详细阐述如何在这样的网络模型中运行可靠的服务。
这个指南中用了一个简单的nginx服务来演示验证这个概念(proof of concept)。同样的原理也在一个更完整的Jenkins
CI 应用中体现了。
在集群中暴露Pod
在前面的例子中已经演示过,让我们把注意力集中在网络的视角在来一次。创建一个nginx的 Pod
,请注意它定义了容器的端口:
$
cat nginxrc.yaml
apiVersion: v1
kind: ReplicationController
metadata:
name: my-nginx
spec:
replicas: 2
template:
metadata:
labels:
app: nginx
spec:
containers:
- name: nginx
image: nginx
ports:
- containerPort: 80 |
这使得它从集群中的任一节点都可以被访问到。检查一下供pod运行的节点:
$
kubectl create -f ./nginxrc.yaml
$ kubectl get pods -l app=nginx -o wide
my-nginx-6isf4 1/1 Running 0 2h e2e-test-beeps-minion-93ly
my-nginx-t26zt 1/1 Running 0 2h e2e-test-beeps-minion-93ly |
检查pod的IP地址:
$
kubectl get pods -l app=nginx -o json | grep
podIP
"podIP": "10.245.0.15",
"podIP": "10.245.0.14", |
你应该可以ssh到集群里的任何一个节点,而且用curl也能够访问这两个IP。要注意的是容器并没有用节点的80端口,也没用任何特殊的会把流量路由到pod的NAT规则。这意味着你可以在同一个节点上用同样的
containerPort 配置运行多个nginx pod,而且通过IP就可以在其他pod或者集群里的其他节点访问它们。和Docker类似,端口也可以在节点的网络接口中发布出来,但是在Kubernetes的这种网络模型下,这样的需求从根本上减少了。
创建Service
现在我们有了运行态的nginx,它们运行在一个水平的,集群范围的地址空间内。理论上,我们已经可以和这些pod直接交互了,但是如果一个节点死掉了会发生什么?它里面的Pod也会死掉,然后Replication
Controller会创建一个新的Pod,但是IP是不一样的。这就是Service可以解决的问题。
Kubernetes Service是对在集群中某处运行的一系列Pod的逻辑集合的抽象定义,这些Pod提供的功能是一样的。每个Service被创建的时候会被分配一个唯一的IP地址(也叫
clusterIP )。这个地址和Service绑定,只要Service活着就不会改变。Pod可以配置成和Service交互,并且知道和Service的通信会被自动地负载均衡到Service成员中的某个Pod。
可以用下面的yaml为两个nginx副本创建一个Service:
$
cat nginxsvc.yaml
apiVersion: v1
kind: Service
metadata:
name: nginxsvc
labels:
app: nginx
spec:
ports:
- port: 80
protocol: TCP
selector:
app: nginx |
这个定义会创建一个Service,这个Service会把带有app=nginx Label的Pod的TCP
80端口暴露到Service的抽象端口(targetPort:是容器可以接收流量的端口,port:是Service的抽象端口,可以是除用来访问Service的端口之外的任何端口)。在Service定义中支持的所有的域可以在Service
API 对象中查看。
查看Service:
$
kubectl get svc
NAME LABELS SELECTOR IP(S) PORT(S)
nginxsvc app=nginx app=nginx 10.0.116.146
80/TCP
|
在前面提到过,Service是由一组Pod支撑的。这些Pod通过endpoints暴露出来。Service会持续评估Selector,并把结果发送给Endpoint对象(也叫做nginxsvc)。当一个Pod死了之后,它就会被自动地从Endpoint里面删掉,能够匹配Service的Selector的新Pod会被自动加到Endpoint里。检查Endpoint的时候也会看到IP和前一步里创建的Pod是一样的:
$
kubectl describe svc nginxsvc
Name: nginxsvc
Namespace: default
Labels: app=nginx
Selector: app=nginx
Type: ClusterIP
IP: 10.0.116.146
Port: <unnamed> 80/TCP
Endpoints: 10.245.0.14:80,10.245.0.15:80
Session Affinity: None
No events.
$ kubectl get ep
NAME ENDPOINTS
nginxsvc 10.245.0.14:80,10.245.0.15:80
|
现在你应该可以从集群里的任一节点上用curl命令访问10.0.116.146:80上的nginx
Service了。要注意的是Service的IP完全是虚拟的,跟物理网络没有关系。
访问Service
Kubernetes支持两种主要的模式来发现Service:环境变量和DNS。环境变量在安装之后就可以直接使用,DNS模式需要kube-dns
集群插件。
环境变量
当一个Pod在某个节点上运行的时候, kubelet 为每个活跃的Service添加一系列的环境变量。这会引入环境变量排序的问题。想知道为什么,检查一下运行中的nginx
Pod的环境:
$
kubectl exec my-nginx-6isf4 -- printenv |
grep SERVICE
KUBERNETES_SERVICE_HOST=10.0.0.1
KUBERNETES_SERVICE_PORT=443
|
注意这里并没有提到Service,这是因为这些副本是在Service之前创建的。这样做的另一个缺点是,调度器也许会把两个Pod放到相同的机器上,如果机器出问题,整个Service就不工作了。正确的方式是把这两个Pod杀掉,然后等Replication
Controller重新创建它们。现在Service是在Pod副本之前存在了,因此Service获得了调度器级别的Pod扩散能力(只要所有的节点的容量是一样的),而且环境变量也是正确的:
$
kubectl scale rc my-nginx --replicas=0; kubectl
scale rc my-nginx --replicas=2;
$ kubectl get pods -l app=nginx -o wide
NAME READY STATUS RESTARTS AGE NODE
my-nginx-5j8ok 1/1 Running 0 2m node1
my-nginx-90vaf 1/1 Running 0 2m node2
$ kubectl exec my-nginx-5j8ok -- printenv
| grep SERVICE
KUBERNETES_SERVICE_PORT=443
NGINXSVC_SERVICE_HOST=10.0.116.146
KUBERNETES_SERVICE_HOST=10.0.0.1
NGINXSVC_SERVICE_PORT=80
|
DNS
Kubernetes提供了一个DNS集群插件Service,这个Service使用 skydns
自动给其他Service分配DNS。可以用下面的命令检查它是否在集群中运行:
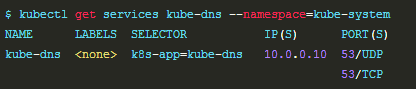
If it isn’t running, you can enable it. The rest
of this sectionwill assume you have a Service
with a long lived ip (nginxsvc), and a dns server
that hasassigned a name to that ip (the kube-dns
cluster addon), so you can talk to the Service
fromany pod in your cluster using standard methods
(e.g. gethostbyname). Let’s create anotherpod
to test this:
$
cat curlpod.yaml
apiVersion: v1
kind: Pod
metadata:
name: curlpod
spec:
containers:
- image: radial/busyboxplus:curl
command:
- sleep
- "3600"
imagePullPolicy: IfNotPresent
name: curlcontainer
restartPolicy: Always |
And perform a lookup of the nginx Service
$
kubectl create -f ./curlpod.yaml
default/curlpod
$ kubectl get pods curlpod
NAME READY STATUS RESTARTS AGE
curlpod 1/1 Running 0 18s
$ kubectl exec curlpod -- nslookup nginxsvc
Server: 10.0.0.10
Address 1: 10.0.0.10
Name: nginxsvc
Address 1: 10.0.116.146 |
Securing the Service
Till now we have only accessed the nginx server
from within the cluster. Before exposing theService
to the internet, you want to make sure the communication
channel is secure. Forthis, you will need:
Self signed certificates for https (unless you
already have an identitiy certificate)
An nginx server configured to use the cretificates
A secret that makes the certificates accessible
to pods
You can acquire all these from the nginx https
example, in short:
$
make keys secret KEY=/tmp/nginx.key CERT=/tmp/nginx.crt
SECRET=/tmp/secret.json
$ kubectl create -f /tmp/secret.json
secrets/nginxsecret
$ kubectl get secrets
NAME TYPE DATA
default-token-il9rc kubernetes.io/service-account-token
1
nginxsecret Opaque |
Now modify your nginx replicas to start a https
server using the certificate in the secret, andthe
Service, to expose both ports (80 and 443): |